Sunday, January 31, 2021

Splash Screen

Splash Screen in Flutter
Splash Screen is the first screen that we see when we run our application. It is also known as Launch Screen. We will implement basic methods to add a splash screen in our app.

Add dependencies
https://pub.dev/packages/flutter_native_splash/install
It'll dev dependencies
  flutter_native_splash: ^0.2.9


  flutter_native_splash: ^0.2.9
flutter_native_splash:
  color: "#ffffff"    //  color
  image: assets/images/download.jpg
  android: true
  ios: true


flutter clean
flutter pub get
flutter pub run flutter_native_splash:create
or
Generate Splash Screen - Single Command: 
flutter clean && flutter pub get && flutter pub run flutter_native_splash:create

Note - Google search for hex color

Full Screen Properties
android_gravity:fill
ios_content_mode: scaleAspectFill

flutter clean && flutter pub get && flutter pub run flutter_native_splash:create


Happy Coding :)
......................................................................................................................................................................................................................................
Example :#1 [ Native setup ]

Step -1. \android\app\src\main\res\drawable\
launch_image.png , put the image like that


Step -2. android\app\src\main\res\drawable
Open the launch_background.xml and uncomment item tag
android\app\src\main\res\drawable\launch_background.xml

<?xml version="1.0" encoding="utf-8"?>
<!-- Modify this file to customize your launch splash screen -->

<layer-list xmlns:android="http://schemas.android.com/apk/res/android">
    <item android:drawable="@color/background_color"/>
    <item>
        <bitmap 
                android:gravity="center" 
               android:src="@drawable/splash"/>
    </item>
</layer-list>


Step -3.  android\app\src\main\res\drawable-v21
open it android\app\src\main\res\drawable-v21\launch_background.xml and uncomment item tag

<?xml version="1.0" encoding="utf-8"?>
<!-- Modify this file to customize your launch splash screen -->
<layer-list xmlns:android="http://schemas.android.com/apk/res/android">
    <!-- <item android:drawable="?android:colorBackground" /> -->
        <!-- <item android:drawable="@android:color/white" /> -->
        <item android:drawable="@color/background_color" />


    <!-- You can insert your own image assets here -->
    <item>
        <bitmap
            android:gravity="center"
            android:src="@drawable/launch_image" />
    </item>
</layer-list>


.........................................................
Step - 4 Create a xml file under Values folder
values/colors.xml
<?xml version="1.0" encoding="utf-8"?>
<resources>
  <color name="background_color">#FFCC00</color>
</resources>


flutter clean
Almost Done :)

Other useful tag
........................................................
<item
android:width="300dp"
android:height="300dp"
android:gravity="center"
>


..................
styles.xml
<?xml version="1.0" encoding="utf-8"?>
<resources>
    <style name="LaunchTheme" parent="@android:style/Theme.Light.NoTitleBar">
        <item name="android:windowBackground">@drawable/launch_background</item>
        <item name="android:windowFullscreen">false</item>
    </style>
    <style name="NormalTheme" parent="@android:style/Theme.Light.NoTitleBar">
        <item name="android:windowBackground">?android:colorBackground</item>
    </style>
</resources>

Happy Coding :)


Saturday, January 30, 2021

Stream Videos || Flutter

 
In build.gradle:
// Put this in your buildtypes debug section:
manifestPlaceholders = [usesCleartextTraffic:"true"]

// Put this in your buildtypes release section
manifestPlaceholders = [usesCleartextTraffic:"false"]

In the application tag in AndroidManifest.xml
android:usesCleartextTraffic="${usesCleartextTraffic}"
<uses-permission android:name="android.permission.INTERNET" />

Or
It'll same work 
manifestPlaceholders = [usesCleartextTraffic:"true"]

In the application tag in AndroidManifest.xml
android:usesCleartextTraffic="${usesCleartextTraffic}"
<uses-permission android:name="android.permission.INTERNET" />


or
android:usesCleartextTraffic="true"
<uses-permission android:name="android.permission.INTERNET" />
..................................................................................................................................................................................................................................
Stream Videos in Flutter Using Video Player Library
dependencies
https://pub.dev/packages/video_player/install
  video_player: ^1.0.1

Code here

import 'package:video_player/video_player.dart';
import 'package:flutter/material.dart';

void main() => runApp(MyApp());

class MyApp extends StatefulWidget {
  @override
  _MyAppState createState() => _MyAppState();
}

class _MyAppState extends State<MyApp> {
  VideoPlayerController _controller;

  @override
  void initState() {
    super.initState();
    _controller = VideoPlayerController.network(
        'http://www.sample-videos.com/video123/mp4/720/big_buck_bunny_720p_20mb.mp4')
      ..initialize().then((_) {
        // Ensure the first frame is shown after the video is initialized, even before the play button has been pressed.
        setState(() {});
      });
  }

  @override
  Widget build(BuildContext context) {
    return MaterialApp(
      title: 'Video Demo',
      home: Scaffold(
        body: Center(
          child: _controller.value.initialized
              ? AspectRatio(
                  aspectRatio: _controller.value.aspectRatio,
                  child: VideoPlayer(_controller),
                )
              : Container(),
        ),
        floatingActionButton: FloatingActionButton(
          onPressed: () {
            setState(() {
              _controller.value.isPlaying
                  ? _controller.pause()
                  : _controller.play();
            });
          },
          child: Icon(
            _controller.value.isPlaying ? Icons.pause : Icons.play_arrow,
          ),
        ),
      ),
    );
  }

  @override
  void dispose() {
    super.dispose();
    _controller.dispose();
  }
}


Happy Coding :)
..................................................................................................................................................................................................................................
Agora
https://www.agora.io/en/

Agora-Flutter-Quickstart
https://github.com/AgoraIO-Community/Agora-Flutter-Quickstart

dependencies
https://github.com/AgoraIO-Community/Agora-Flutter-Quickstart/blob/master/pubspec.yaml
  agora_rtc_engine: ^3.1.3
  permission_handler: ^5.0.1


Happy Coding :)
..................................................................................................................................................................................................................................
Audioplayers

dependencies
https://pub.dev/packages/audioplayers/install
  audioplayers: ^0.17.3

Code Here

import 'package:audioplayers/audio_cache.dart';
import 'package:audioplayers/audioplayers.dart';
import 'package:flutter/material.dart';

void main() {
  runApp(MyApp());
}

class MyApp extends StatelessWidget {
  // This widget is the root of your application.
  @override
  Widget build(BuildContext context) {
    return MaterialApp(
      debugShowCheckedModeBanner: false,
      home: MusicApp(),
    );
  }
}

class MusicApp extends StatefulWidget {
  @override
  _MusicAppState createState() => _MusicAppState();
}

class _MusicAppState extends State<MusicApp> {
  
  bool playing = false; 
  IconData playBtn = Icons.play_arrow; 

  AudioPlayer _player;
  AudioCache cache;

  Duration position = Duration();
  Duration musicLength =Duration();

  //we will create a custom slider

  Widget slider() {
    return Container(
      width: 300.0,
      child: Slider.adaptive(
          activeColor: Colors.blue[800],
          inactiveColor: Colors.grey[350],
          value: position.inSeconds.toDouble(),
          max: musicLength.inSeconds.toDouble(),
          onChanged: (value) {
            seekToSec(value.toInt());
          }),
    );
  }

  void seekToSec(int sec) {
    Duration newPos = Duration(seconds: sec);
    _player.seek(newPos);
  }

  @override
  void initState() {
    super.initState();
    _player = AudioPlayer();
    cache = AudioCache(fixedPlayer: _player);

    _player.positionHandler = (d) {
      setState(() {
        musicLength = d;
      });
    };

   
    _player.positionHandler = (p) {
      setState(() {
        position = p;
      });
    };
  }

  @override
  Widget build(BuildContext context) {
    return Scaffold(
      
      body: Container(
        width: double.infinity,
        decoration: BoxDecoration(
          gradient: LinearGradient(
              begin: Alignment.topLeft,
              end: Alignment.bottomRight,
              colors: [
                Colors.blue[800],
                Colors.blue[200],
              ]),
        ),
        child: Padding(
          padding: EdgeInsets.only(
            top: 48.0,
          ),
          child: Container(
            child: Column(
              mainAxisAlignment: MainAxisAlignment.start,
              crossAxisAlignment: CrossAxisAlignment.start,
              children: [
               
                Padding(
                  padding: const EdgeInsets.only(left: 12.0),
                  child: Text(
                    "Music Beats",
                    style: TextStyle(
                      color: Colors.white,
                      fontSize: 38.0,
                      fontWeight: FontWeight.bold,
                    ),
                  ),
                ),
                Padding(
                  padding: EdgeInsets.only(left: 12.0),
                  child: Text(
                    "Listen to your favorite Music",
                    style: TextStyle(
                      color: Colors.white,
                      fontSize: 24.0,
                      fontWeight: FontWeight.w400,
                    ),
                  ),
                ),
                SizedBox(
                  height: 24.0,
                ),
                Center(
                  child: Container(
                    width: 280.0,
                    height: 280.0,
                    decoration: BoxDecoration(
                        borderRadius: BorderRadius.circular(30.0),
                        image: DecorationImage(
                          image: AssetImage("assets/images/download.jpg"),
                        )),
                  ),
                ),

                SizedBox(
                  height: 18.0,
                ),
                Center(
                  child: const Text(
                    "Stargazer",
                    style: TextStyle(
                      color: Colors.white,
                      fontSize: 32.0,
                      fontWeight: FontWeight.w600,
                    ),
                  ),
                ),
                SizedBox(
                  height: 30.0,
                ),
                Expanded(
                  child: Container(
                    decoration: BoxDecoration(
                      color: Colors.white,
                      borderRadius: BorderRadius.only(
                        topLeft: Radius.circular(30.0),
                        topRight: Radius.circular(30.0),
                      ),
                    ),
                    child: Column(
                      mainAxisAlignment: MainAxisAlignment.center,
                      crossAxisAlignment: CrossAxisAlignment.center,
                      children: [
                        Container(
                          width: 500.0,
                          child: Row(
                            mainAxisAlignment: MainAxisAlignment.center,
                            crossAxisAlignment: CrossAxisAlignment.center,
                            children: [
                              Text(
                                "${position.inMinutes}:${position.inSeconds.remainder(60)}",
                                style: TextStyle(
                                  fontSize: 18.0,
                                ),
                              ),
                              slider(),
                              Text(
                                "${musicLength.inMinutes}:${musicLength.inSeconds.remainder(60)}",
                                style: TextStyle(
                                  fontSize: 18.0,
                                ),
                              ),
                            ],
                          ),
                        ),
                        Row(
                          mainAxisAlignment: MainAxisAlignment.center,
                          crossAxisAlignment: CrossAxisAlignment.center,
                          children: [
                            IconButton(
                              iconSize: 45.0,
                              color: Colors.blue,
                              onPressed: () {},
                              icon: Icon(
                                Icons.skip_previous,
                              ),
                            ),
                            IconButton(
                              iconSize: 62.0,
                              color: Colors.blue[800],
                              onPressed: () {
                               
                                if (!playing) {
                                  
                                  cache.play("Stargazer.mp3");
                                  setState(() {
                                    playBtn = Icons.pause;
                                    playing = true;
                                  });
                                } else {
                                  _player.pause();
                                  setState(() {
                                    playBtn = Icons.play_arrow;
                                    playing = false;
                                  });
                                }
                              },
                              icon: Icon(
                                playBtn,
                              ),
                            ),
                            IconButton(
                              iconSize: 45.0,
                              color: Colors.blue,
                              onPressed: () {},
                              icon: Icon(
                                Icons.skip_next,
                              ),
                            ),
                          ],
                        )
                      ],
                    ),
                  ),
                ),
              ],
            ),
          ),
        ),
      ),
    );
  }
}

Happy Coding :)
..................................................................................................................................................................................................................................


..................................................................................................................................................................................................................................


Tuesday, January 26, 2021

Shared Preferences || Flutter


Shared Preferences with Flutter
Shared Preferences is one of the ways to do it. It provides a way of reading and storing such data in a key-value pair.

What is Shared Preferences?
When you're working on some client apps, you'll often come across situations, where you need to store some data in the persistent storage of devices. For example, let's say you're using some OAuth client for one of your login methods, for that you'll need to store the access token on the client's device so that the client does not have to sign in again on relaunching the app.

Adding shared_preferences in pubspec.yaml

https://pub.dev/packages/shared_preferences/install
shared_preferences: ^0.5.12+4

Please set your constraint to shared_preferences: '>=0.5.y+x <2.0.0'

In our main.dart file, Let's convert our main function to async
void main() async{
  runApp(myApp);
  await StorageService.createInstance();
}

Happy Coding :)
.................................................................................................................................................................................................................................
Example :#1


Happy Coding :)
.................................................................................................................................................................................................................................
Example :#2


Happy Coding :)

Url Launcher || Flutter

Url Launcher || Flutter 

The Url Launcher is used to launch other services
Phonebook
SMS
Email
Apps
Browser
WebView

dependencies
https://pub.dev/packages/url_launcher/install
  url_launcher: ^5.7.10

Note - 
was url launchar does not work on android 11 by If you donot add this line in manifest.xml
<uses-permission android:name="android.permission.QUERY_ALL_PACKAGES"/>

or
<manifest>

    <!-- Nest within the manifest element, not the application element-->
    <queries>
        <intent>
            <action android:name="android.intent.action.VIEW" />
            <data android:scheme="https" />
        </intent>
        <intent>
            <action android:name="android.intent.action.DIAL" />
            <data android:scheme="tel" />
        </intent>
        <intent>
            <action android:name="android.intent.action.SEND" />
            <data android:mimeType="*/*" />
        </intent>
    </queries>

    <application>
        ....
    </application>
</manifest>
........................................................................................................................................................................................................................
Example :#1
import 'package:flutter/material.dart';
import 'package:url_launcher/url_launcher.dart';

void main() {
  runApp(MyApp());
  }
  class MyApp extends StatelessWidget {
    @override
    Widget build(BuildContext context) {
      return MaterialApp(
        home: Home(),
      );
    }
  }
    class Home extends StatefulWidget {
      @override
      _HomeState createState() => _HomeState();
    }
    
    class _HomeState extends State<Home> {
      @override
      Widget build(BuildContext context) {
        return Scaffold(
          body: Center(
      child: RaisedButton(
        onPressed: _launchURL,
        child: Text('Show Flutter homepage'),
      ),
    ),
          
        );
      }
    }

_launchURL() async {
  const url = 'https://flutter.dev';
  if (await canLaunch(url)) {
    await launch(url);
  } else {
    throw 'Could not launch $url';
  }
}

Happy Coding :)
........................................................................................................................................................................................................................
Example :#2

Utils.dart
import 'package:flutter/foundation.dart';
import 'package:url_launcher/url_launcher.dart';

class Utils {
  static Future openLink({
    @required String url,
  }) =>
      _launchUrl(url);

  static Future openEmail({
    @required String toEmail,
    @required String subject,
    @required String body,
  }) async {
    final url =
        'mailto:$toEmail?subject=${Uri.encodeFull(subject)}&body=${Uri.encodeFull(body)}';

    await _launchUrl(url);
  }

  static Future openPhoneCall({@required String phoneNumber}) async {
    final url = 'tel:$phoneNumber';

    await _launchUrl(url);
  }

  static Future openSMS({@required String phoneNumber}) async {
    final url = 'sms:$phoneNumber';

    await _launchUrl(url);
  }

  static Future _launchUrl(String url) async {
    if (await canLaunch(url)) {
      await launch(url);
    }
  }
}
..................................
main.dart
import 'package:flutter/material.dart';
import 'package:urllaunchers/utils.dart';

void main() => runApp(MyApp());

class MyApp extends StatelessWidget {
  final String title = 'Url Launcher';

  @override
  Widget build(BuildContext context) => MaterialApp(
        title: title,
        theme: ThemeData(primarySwatch: Colors.deepOrange),
        home: MainPage(title: title),
      );
}

class MainPage extends StatefulWidget {
  final String title;

  const MainPage({
    @required this.title,
  });

  @override
  _MainPageState createState() => _MainPageState();
}

class _MainPageState extends State<MainPage> {
  @override
  Widget build(BuildContext context) => Scaffold(
        appBar: AppBar(
          title: Text(widget.title),
        ),
        body: Center(
          child: Column(
            mainAxisAlignment: MainAxisAlignment.center,
            children: [
              buildButton(
                text: 'Open Link',
                onClicked: () => Utils.openLink(url: 'http://flutter.dev'),
              ),
              buildButton(
                text: 'Open Email',
                onClicked: () => Utils.openEmail(
                  toEmail: 'example@gmail.com',
                  subject: 'Hello World',
                  body: 'This works great!',
                ),
              ),
              buildButton(
                text: 'Open Call',
                onClicked: () =>
                    Utils.openPhoneCall(phoneNumber: '+4912388128311'),
              ),
              buildButton(
                text: 'Open SMS',
                onClicked: () => Utils.openSMS(phoneNumber: '+4912388128311'),
              ),
            ],
          ),
        ),
      );

  Widget buildButton({
    @required String text,
    @required VoidCallback onClicked,
  }) =>
      Container(
        padding: EdgeInsets.symmetric(vertical: 12),
        child: RaisedButton(
          shape: StadiumBorder(),
          onPressed: onClicked,
          color: Colors.red,
          textColor: Colors.white,
          child: Text(
            text,
            style: TextStyle(fontSize: 24),
          ),
        ),
      );
}
Happy Coding :)
........................................................................................................................................................................................................................
Example :#3
//Add the url_laucher package in your pubspec.yaml

import 'package:flutter/material.dart';
import 'package:url_launcher/url_launcher.dart';

void main() {
  runApp(MyApp());
}

class MyApp extends StatelessWidget {
  @override
  Widget build(BuildContext context) {
    return MaterialApp(
      debugShowCheckedModeBanner: false,
      title: 'Url Launcher',
      theme: ThemeData(
        primarySwatch: Colors.blue,
        visualDensity: VisualDensity.adaptivePlatformDensity,
      ),
      home: UrlLauncher(),
    );
  }
}

class UrlLauncher extends StatefulWidget {
  @override
  _UrlLauncherState createState() => _UrlLauncherState();
}

Future<void> _launched;

//To open phonebook
Future<void> _callUsers(String url) async {
  if (await canLaunch(url)) {
    await launch(url);
  } else {
    throw 'Could not launch $url';
  }
}

//To open Messaging app
Future<void> _smsUsers(String url) async {
  if (await canLaunch(url)) {
    await launch(url);
  } else {
    throw 'Could not launch $url';
  }
}

//To open email/gmail
Future<void> _mailUsers(String url) async {
  if (await canLaunch(url)) {
    await launch(url);
  } else {
    throw 'Could not launch $url';
  }
}

//To open installed app in the device
Future<void> _launchUniversalLinkIos(String url) async {
  if (await canLaunch(url)) {
    final bool nativeAppLaunchSucceeded = await launch(
      url,
      forceSafariVC: false,
      universalLinksOnly: true,
    );
    if (!nativeAppLaunchSucceeded) {
      await launch(
        url,
        forceSafariVC: true,
      );
    }
  }
}

//To open link in browser
Future<void> _launchInBrowser(String url) async {
  if (await canLaunch(url)) {
    await launch(url);
  } else {
    throw 'Could not launch $url';
  }
}

//To open link in webView
Future<void> _launchInWebView(String url) async {
  if (await canLaunch(url)) {
    await launch(
      url,
      forceSafariVC: true,
      forceWebView: true,
      headers: <String, String>{'my_header_key': 'my_header_value'},
    );
  } else {
    throw 'Could not launch $url';
  }
}

class _UrlLauncherState extends State<UrlLauncher> {
  @override
  Widget build(BuildContext context) {
    return Scaffold(
      body: GridView.count(
        crossAxisCount: 2,
        children: <Widget>[
          LauncherButton(
            color: Color(0xffF3D180),
            icon: Icons.phone,
            text: 'Phone',
            onPress: () => setState(() {
              _launched = _callUsers('tel:95521515');
            }),
          ),
          LauncherButton(
            color: Color(0xffFCBF49),
            icon: Icons.sms,
            text: 'SMS',
            onPress: () => setState(() {
              _launched = _smsUsers('sms:5550101234');
            }),
          ),
          LauncherButton(
            color: Color(0xffF77F00),
            icon: Icons.mail,
            text: 'Email',
            onPress: () => setState(() {
              _launched = _mailUsers(
                  'mailto:smith@example.org?subject=UrlPackage&body=It%20is%20awesome');
            }),
          ),
          LauncherButton(
            color: Color(0xffD62828),
            icon: Icons.play_arrow,
            text: 'Youtube',
            onPress: () => setState(() {
              _launched = _launchUniversalLinkIos('https://www.youtube.com/');
            }),
          ),
          LauncherButton(
            color: Color(0xff2E933C),
            icon: Icons.public,
            text: 'Brower',
            onPress: () => setState(() {
              _launched = _launchInBrowser('https://www.google.com/');
            }),
          ),
          LauncherButton(
            color: Color(0xff1B4965),
            icon: Icons.http,
            text: 'WebView',
            onPress: () => setState(() {
              _launched = _launchInWebView('https://www.google.com/');
            }),
          ),
        ],
      ),
    );
  }
}

class LauncherButton extends StatelessWidget {
  final Color color;
  final IconData icon;
  final Function onPress;
  final String text;

  const LauncherButton({this.color, this.icon, this.onPress, this.text});
  @override
  Widget build(BuildContext context) {
    return GestureDetector(
      onTap: onPress,
      child: Padding(
        padding: const EdgeInsets.all(20.0),
        child: Container(
          decoration: BoxDecoration(
            color: color,
            borderRadius: BorderRadius.circular(
              25.0,
            ),
          ),
          child: Column(
            mainAxisAlignment: MainAxisAlignment.center,
            children: <Widget>[
              Icon(
                icon,
                size: 60,
                color: Colors.white,
              ),
              Text(
                text,
                style: TextStyle(
                  height: 2,
                  fontSize: 20,
                  color: Colors.white,
                ),
              ),
            ],
          ),
        ),
      ),
    );
  }
}
Happy Coding:)
........................................................................................................................................................................................................................
Example :#4

TabBar || Flutter

 ...............................................................................................................................................................................................................................
Example:  #1 
First, we will see the basic example of TabBar, Three things are important while creating a tab bar
1. Create a TabController.
2. Create the tabs.
3. Create content for each tab.

Code Here
import 'package:flutter/material.dart';

void main() {
  runApp(MyApp());
}

class MyApp extends StatelessWidget {
  @override
  Widget build(BuildContext context) {
    return MaterialApp(
      debugShowCheckedModeBanner: false,
      home: Home(),
    );
  }
}

class Home extends StatefulWidget {
  @override
  _HomeState createState() => _HomeState();
}

class _HomeState extends State<Home> {
  @override
  Widget build(BuildContext context) {
    return DefaultTabController(
      length: 2,
      child: Scaffold(
        appBar: AppBar(
          title: Text("Default tab bar!"),
          bottom: TabBar(
            tabs: [
              Tab(text: "Home", icon: Icon(Icons.home)),
              Tab(text: "Setting", icon: Icon(Icons.add_shopping_cart)),
            ],
          ),
        ),
      ),
    );
  }
}

Happy Coding :)
 ...............................................................................................................................................................................................................................
Example:  #2 
import 'package:flutter/material.dart';

void main() {
  runApp(MyApp());
}

class MyApp extends StatelessWidget {
  @override
  Widget build(BuildContext context) {
    return MaterialApp(
      home: Home(),
    );
  }
}

class Home extends StatefulWidget {
  @override
  _HomeState createState() => _HomeState();
}

class _HomeState extends State<Home> {
  @override
  Widget build(BuildContext context) {
    return DefaultTabController(
      length: 2,
          child: Scaffold(
        appBar: AppBar(
          title: Text('Home'),
        ),
        body: Padding(
          padding: const EdgeInsets.symmetric(vertical: 30.0, horizontal: 30.0),
          child: Column(
            children:<Widget>[
              Container(  
                width: 100,
                height: 100,color: Colors.blue,
              ),
              Container(
                decoration: BoxDecoration(  
                  color: Colors.red,
                  borderRadius: BorderRadius.circular(20)
                ),
                child: Padding(
                  padding: const EdgeInsets.all(12.0),
                  child: TabBar(
                    indicator: BoxDecoration(  
                      color: Colors.pink[800],
                      borderRadius: BorderRadius.circular(20)
                    ),
                    tabs:[
                    Tab(text:"Tab1"),
                    Tab(text: "Tab2",),
                  ]),
                ),
              ),
              SizedBox( 
                height: 300,
                child: TabBarView(  
                  children: [
                    Container(  
                      height: 100,
                      width: 100,
                      decoration: BoxDecoration(  
                        color: Colors.red,
                        borderRadius: BorderRadius.circular(20)
                      ),
                      child: Center(child: Text('Hello')),
                    ),
                  ],
                ),
              )
              
            ],
            
          ),
        ),
      ),
    );
  }
}


Happy Coding :)
 ...............................................................................................................................................................................................................................
Example:  #3 []
import 'package:flutter/material.dart';  
  
void main() => runApp(MyApp());  
  
class MyApp extends StatelessWidget {  
  @override  
  Widget build(BuildContext context) {  
    return MaterialApp(  
      theme: ThemeData(  
        primarySwatch: Colors.green,  
      ),  
      home: MyHomePage(),  
    );  
  }  
}  
  
class MyHomePage extends StatefulWidget {  
  @override  
  _MyHomePageState createState() => _MyHomePageState();  
}  
  
class _MyHomePageState extends State<MyHomePage> {  
  var lists = List<String>.generate(10, (index) => "List : $index");  
  @override  
  Widget build(BuildContext context) {  
    return Scaffold(  
      appBar: AppBar(  
        title: Text('Flutter SnackBar Demo'),  
      ),  
      body: ListView.builder(  
        itemCount: lists.length,  
        itemBuilder: (context, index) {  
          return ListTile(  
            title: Text(lists[index]),  
            trailing: Container(  
              width: 60,  
              child: FlatButton(  
                child: Icon(  
                  Icons.delete,  
                  color: Colors.grey,  
                ),  
                onPressed: () {  
                  showSnackBar(context, index);  
                },  
              ),  
            ),  
          );  
        },  
      ),  
    );  
  }  
  
  void showSnackBar(BuildContext context, int index) {  
    var deletedRecord = lists[index];  
    setState(() {  
      lists.removeAt(index);  
    });  
    SnackBar snackBar = SnackBar(  
      content: Text('Deleted $deletedRecord'),  
      action: SnackBarAction(  
        label: "UNDO",  
        onPressed: () {  
          setState(() {  
            lists.insert(index, deletedRecord);  
          });  
        },  
      ),  
    );  
    Scaffold.of(context).showSnackBar(snackBar);  
  }  
}  

Happy Coding :)
 ...............................................................................................................................................................................................................................
Example:  #4 []


Happy Coding :)

Thursday, January 21, 2021

Facebook Login | Google Login | Apple Login

 Flutter Facebook Login | How To Add Facebook Login Into Flutter App - Step By Step Guide


Create a Facebook App in Facebook Developer Console,
FaceBook Developer page https://developers.facebook.com/
Then, create a new app using MyApp => Create App, give an app name and create the app. Check out the below screenshot.

Click the Create App tab

In Mycase is Business Integrations


Enter the Project Name and choose App purpose

Now created APP ID and Secret


Go back to firebase console
https://console.firebase.google.com/?pli=1

Create a Firebase project
In the Firebase console, Click Add Project


As shown in the screencap below, enter a name for your Firebase project and click "Continue".


Next, configure Google Analytics, so you can turn it off, then click "Create project".


After a minute or so, your Firebase project will be ready. Click Continue.


Enable Facebook Sign-In method in Firebase 

Now, you need to enable the Facebook Sign-In method in Firebase. For that, you need to go to the Authentication tab and then Sign-in method tab. From there, enable Facebook Sign-In method. Please check the screenshot.


You need an App ID and App secret. Get that from your Facebook app that you have created in previous steps. You will get the App Id and App secret from Settings => Basic. Note: Click on "Show App Secrete" to copy it.


Now look like Facebook Enabled


Go to the Dashboard tab. Under "Products", you will find Facebook Login=>Settings (click on that).
Then, on the left side, you will find QuickStart under Facebook Login menu. Just click on it.
Select Android.


Platform-specific Facebook configuration and mycase is Platform Android


Click the Next 

Next

On the next two screens, just click "Next". After that, you will get a screen asking for your Android project. Give the package name and default Activity Class name as I have given in the below screenshot. And go to Save => Use This Package => Continue.


Save and Next
On the next screen, you need to add your development and release key hashes. Follow Mac or Windows as per your OS and enter the hash key. Please note that the default Android Keystore password is "android". Copy the hash key and paste there and go to Save => Continue.
Now, click "Next".

Add Your Development and Release Key Hashes
Generating a Release Key Hash
Note -  don't put here debug key, because when our app will be release mode that time should be change it again.
Setp for Release key

openssl-for-windows (download it)
https://code.google.com/archive/p/openssl-for-windows/downloads
Then set path  upto bin, ie
C:\Users\sapan\Downloads\openssl-0.9.8k_X64\bin

Run the command for release key and password default is android

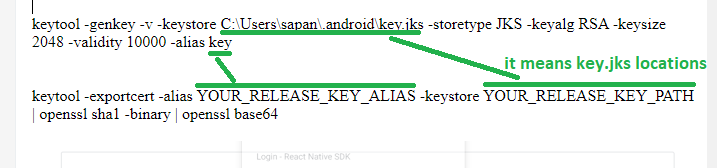
keytool -genkey -v -keystore C:\Users\sapan\.android\key.jks -storetype JKS -keyalg RSA -keysize 2048 -validity 10000 -alias key

Once done the above command , we'll get key.jks

keytool -exportcert -alias YOUR_RELEASE_KEY_ALIAS -keystore YOUR_RELEASE_KEY_PATH | openssl sha1 -binary | openssl base64

More info

Final Command is 
keytool -exportcert -alias key -keystore C:\Users\sapan\.android\key.jks | openssl sha1 -binary | openssl base64

Password default is android

Save and Next

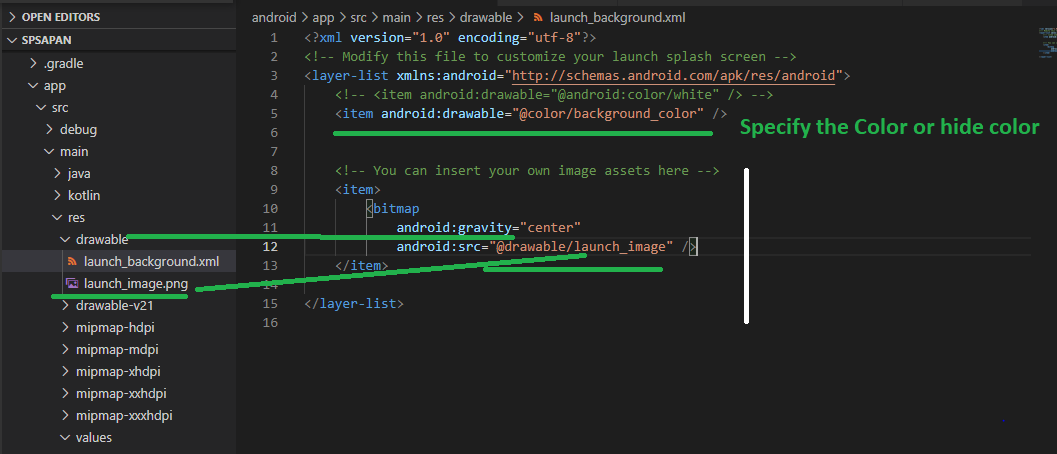
Next, you need to put a lot of stuff in your app.

Go to your project's android/app/src/main/res/values folder. Under the Values folder, create a new file named strings.xml and put the below string (you have in your Facebook project ) in this file.

Code available there https://pub.dev/packages/flutter_facebook_login

<?xml version="1.0" encoding="utf-8"?>
<resources>
    <string name="app_name">Enter project name</string>
   <string name="facebook_app_id">1835494063281995</string>
<string name="fb_login_protocol_scheme">fb1835494063281995</string>

</resources>


Open the /app/manifest/AndroidManifest.xml file.
  <uses-permission android:name="android.permission.INTERNET"/>


Then, go to android/app/src/main/AndroidManifest.xml and paste the below code (you have in your Facebook project) under first activity and in the application tag. Please check the screenshot for better undestanding.

<meta-data android:name="com.facebook.sdk.ApplicationId" 
        android:value="@string/facebook_app_id"/>
    
    <activity android:name="com.facebook.FacebookActivity"
        android:configChanges=
                "keyboard|keyboardHidden|screenLayout|screenSize|orientation"
        android:label="@string/app_name" />
    <activity
        android:name="com.facebook.CustomTabActivity"
        android:exported="true">
        <intent-filter>
            <action android:name="android.intent.action.VIEW" />
            <category android:name="android.intent.category.DEFAULT" />
            <category android:name="android.intent.category.BROWSABLE" />
            <data android:scheme="@string/fb_login_protocol_scheme" />
        </intent-filter>
    </activity>


Click "Next" for all further screens.

Copy the OAuth redirect from the Firebase app and paste in Facebook App. Facebook Login=>Settings >> Valid OAuth Redirect URIs. Please check the below screenshot.
Copy from Firebase App


Add Privacy Policy URL


Privacy Policy Generator

https://www.freeprivacypolicy.com/


Last step is Click the Remove App Type

Enabled it


All done with Firebase Setup. 

Dependency Setup in Firebase project 

Get back to the project and open the pubspec.yaml file in the root of the project. Pubspec.yaml is used to define all the dependencies and assets of the project. Add the below dependencies and save the file.

add dependencies
https://pub.dev/packages/firebase_auth/install
  firebase_auth: ^0.20.0+1

https://pub.dev/packages/flutter_facebook_login/install
  flutter_facebook_login: ^3.0.0

Now, we are done with all dependency setup at project side as well.
 We need to programmatically handle the Facebook login in Google Firebase.

Code Here

import 'package:firebase_core/firebase_core.dart';
import 'package:flutter/material.dart';
import 'package:flutter_facebook_login/flutter_facebook_login.dart';

void main() async {
  WidgetsFlutterBinding.ensureInitialized();
  await Firebase.initializeApp();
  runApp(MyApp());
}

class MyApp extends StatelessWidget {
  // This widget is the root of your application.
  @override
  Widget build(BuildContext context) {
    return MaterialApp(
      title: 'Flutter Demo',
      theme: ThemeData(
        primarySwatch: Colors.blue,
      ),
      home: MyHomePage(),
    );
  }
}

class MyHomePage extends StatefulWidget {
  @override
  _MyHomePageState createState() => _MyHomePageState();
}

Future<FacebookLoginResult> facebookLogin() async {
      FacebookLogin facebookLogin = FacebookLogin();

    FacebookLoginResult facebookLoginResult =
        await facebookLogin.logIn(['email', 'public_profile']);

       switch (facebookLoginResult.status) {
      case FacebookLoginStatus.cancelledByUser:
        print("Cancelled");
        break;
      case FacebookLoginStatus.error:
        print("error");
        break;
      case FacebookLoginStatus.loggedIn:
        print("Logged In");
        break;
    }
    return facebookLoginResult;
  }

class _MyHomePageState extends State<MyHomePage> {
  @override
  Widget build(BuildContext context) {
    return Scaffold(
        appBar: AppBar(
          title: Text("Facebook"),
        ),
        body: Center(
          child: Column(
            children: [
              RaisedButton(
                onPressed: () {
                  facebookLogin();
                  print("Hello");
                },
                child: Text('Facebook login'),
              ),
            ],
          ),
        ));
  }
}
Happy Coding :)
...........................................................................................................................................................................................................................
Future<FacebookLoginResult> facebookLogin() async {
      FacebookLogin facebookLogin = FacebookLogin();
    FacebookLoginResult facebookLoginResult =
        await facebookLogin.logIn(['email','public_profile']);
        final accessToken = facebookLoginResult.accessToken.token;

       if(facebookLoginResult.status ==FacebookLoginStatus.loggedIn) {
      final facebookAuthCred =
              FacebookAuthProvider.credential(accessToken);
              
      final user = await FirebaseAuth.instance.signInWithCredential(facebookAuthCred);
      print("User :  + $user");
    }
    return facebookLoginResult;
  }


...........................................................................................................................................................................................................................

...........................................................................................................................................................................................................................

https://firebase.google.com/support/release-notes/android#kotlin+ktx
above site help us to find out of current  stable versions

app/build.gradle
   // implementation 'com.google.firebase:firebase-analytics'
   // implementation 'com.google.firebase:firebase-analytics:17.5.0'
    implementation 'com.google.firebase:firebase-analytics-ktx:18.0.2'


Add this to your package's pubspec.yaml file

https://pub.dev/packages/google_sign_in/install
dependencies:
  google_sign_in: ^4.5.9

https://pub.dev/packages/firebase_core/install
  firebase_core: ^0.7.0

https://pub.dev/packages/firebase_auth/install  
firebase_auth: ^0.20.0+1

https://pub.dev/packages/provider/install  
provider: ^4.3.3

https://pub.dev/packages/flutter_signin_button
  flutter_signin_button: ^1.1.0
...........................................................................................................................................................................................................................
Flutter Signin Button

Add dependencies
https://pub.dev/packages/flutter_signin_button
  flutter_signin_button: ^1.1.0

Code Here
import 'package:flutter/material.dart';
import 'package:flutter_signin_button/button_list.dart';
import 'package:flutter_signin_button/button_view.dart';
import 'package:googlesignin1/screens/home.dart';

class Login extends StatefulWidget {
  @override
  _LoginState createState() => _LoginState();
}

class _LoginState extends State<Login> {
  @override
  Widget build(BuildContext context) {
    return Scaffold(
      body: Center(
        child: Column(
          mainAxisAlignment: MainAxisAlignment.center,
          crossAxisAlignment: CrossAxisAlignment.center,
          children: [
            SignInButton(Buttons.Google,
            onPressed: ()=>Navigator.of(context).pushReplacement(
              MaterialPageRoute(builder: (context)=>Home()))
            ),
            SignInButton(Buttons.FacebookNew,
            onPressed: ()=>Navigator.of(context).pushReplacement(
              MaterialPageRoute(builder: (context)=>Home()))
            ),
            SignInButton(Buttons.Twitter,
            onPressed: ()=>Navigator.of(context).pushReplacement(
              MaterialPageRoute(builder: (context)=>Home()))
            ),
          ],
        ),
      ),
    );
  }
}

Happy Coding :)
...........................................................................................................................................................................................................................


...........................................................................................................................................................................................................................


...........................................................................................................................................................................................................................