Step # 1: Installation
yarn add express graphql express-graphql axios
//devDependencies
yarn add --dev nodemon
I use SpaceX data using their API.
............................................................................................................................................................................................................................
Step # 2: Project Structure
............................................................................................................................................................................................................................
Step # 3: package.json
I Edit it
"server": "nodemon App/App.js",
"start": "node App/App.js",
............................................................................................................................................................................................................................
Step # 4: App/App.js
const express = require('express')
const graphqlHTTP = require('express-graphql')
const
GraphQLSchema = require('../Schema/Schema')
const app = express()
//graphql only have one End point
app.use('/graphql', graphqlHTTP({
schema:
GraphQLSchema
graphiql:true
}))
const port = process.env.PORT || 3000
app.listen(port,()=>{
console.log(`Server is running on port ${port}`)
})
............................................................................................................................................................................................................................
Step # 5 :schema/Schema.js
const axios =require('axios')
const {GraphQLObjectType, GraphQLInt, GraphQLString, GraphQLBoolean, GraphQLList, GraphQLSchema }=require('graphql')
//Launch Type
const LaunchType = new GraphQLObjectType({
name:'Launch',
fields:()=>({
flight_number:{type:GraphQLInt},
mission_name: { type: GraphQLString},
launch_year : { type: GraphQLString},
launch_date_local:{ type: GraphQLString},
launch_success: { type: GraphQLBoolean},
rocket:{ type:
RocketType}
})
})
//Rocket Type
const RocketType = new GraphQLObjectType({
name: '
RocketType',
fields:()=>({
rocket_id: {type: GraphQLString},
rocket_name:{ type: GraphQLString},
rocket_type: { type: GraphQLString}
})
})
//Root Query
const RootQuery = new GraphQLObjectType({
name: 'RootQueryType',
fields:{
launches:{
type: new GraphQLList(LaunchType),
resolve(parent, args){
return axios.default('https://api.spacexdata.com/v3/launches')
.then(res=> res.data)
}
},
// individual only
launch:{
type: LaunchType,
args:{
flight_number: {type: GraphQLInt}
},
resolve(parent, args){
return axios.default(`https://api.spacexdata.com/v3/launches/${args.flight_number}`)
.then(res=>res.data)
}
}
}
})
module.exports = new GraphQLSchema({
query: RootQuery
})
................................................................................................................................................................................................................
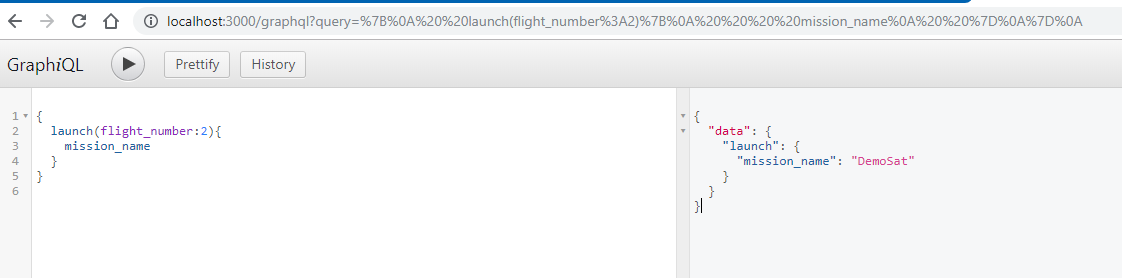
Step # 6
localhost:3000/graphql
............................................................................................................................................................................................................................
React
Step # 1 : Installation
npx create-react-app client
npm i concurrently
or
yarn add concurrently
Step # 2 : Package.json
"client": "npm start --prefix client",
"dev": "concurrently \"npm run server\" \"npm run client\"",
Step # 3: run
npm run dev
or
yarn dev
........................................................................................................................................................................................................
Example - 2
const express = require('express')
const graphqlHTTP = require('express-graphql')
const app = express()
const { GraphQLObjectType, GraphQLSchema, GraphQLString } = require('graphql')
const schema = new GraphQLSchema({
query: new GraphQLObjectType({
name: 'msg',
fields: () => ({
message: {
type: GraphQLString,
resolve: () => 'Hello world'
}
})
})
})
app.use('/graphql', graphqlHTTP({
graphiql: true,
schema: schema
}))
const port = process.env.PORT || 3000
app.listen(port, () => {
console.log(`Server is running on port ${port}`)
})
............................................................................................................................................................................................................................
Example -3 with React
yarn add apollo-boost react-apollo graphql
App.js
import React, { Component } from 'react'
import ApolloClient from 'apollo-boost'
import { ApolloProvider } from 'react-apollo'
import Home from './components/Home'
const client = new ApolloClient({
uri:'http://localhost:5000/graphql'
})
class App extends Component{
render(){
return(
<ApolloProvider client={client}>
<div >
<h1 style={{color: 'green'}}> Hello React</h1>
</div>
<Home/>
</ApolloProvider>
)
}
}
export default App
.....................................................................................................................................................................................................................
import React, { Component, Fragment } from 'react'
import { Query } from 'react-apollo'
import gql from 'graphql-tag'
const LAUNCHERY_QUERY = gql`
query LaunchesQuery {
launches{
flight_number,
mission_name
}
}
`;
class Home extends Component {
render() {
return (
<Fragment>
<h1>Launches</h1>
<Query query={LAUNCHERY_QUERY}>
{
({ loading, error, data }) => {
if (loading) return<h4>Loading...</h4>
if(error)console.log(error)
console.log(data)
return <h1>Successful</h1>
}
}
</Query>
</Fragment>
)
}
}
export default Home
........................................................................................................................................................................................................................
.....................................................................................................................................................................................................
Setting Up Database & Server
#Server
Example: # 3
Installation: # 3.1
yarn add apollo-server graphql
code: # 3.2
const { ApolloServer } = require('apollo-server')
const gql = require('graphql-tag')
const typeDefs = gql`
type Query{
sayHi:String!
}
`;
const resolvers = {
Query: {
sayHi: () => 'Hello world'
}
}
const Server = new ApolloServer({
typeDefs,
resolvers
})
Server.listen({ port: 5000 })
.then(res => {
console.log(`Server running at ${res.url}`)
})
run: # 3.3
node server/server
http://localhost:5000/
query{
sayHi
}
.....................................................................................................................................................................................................................
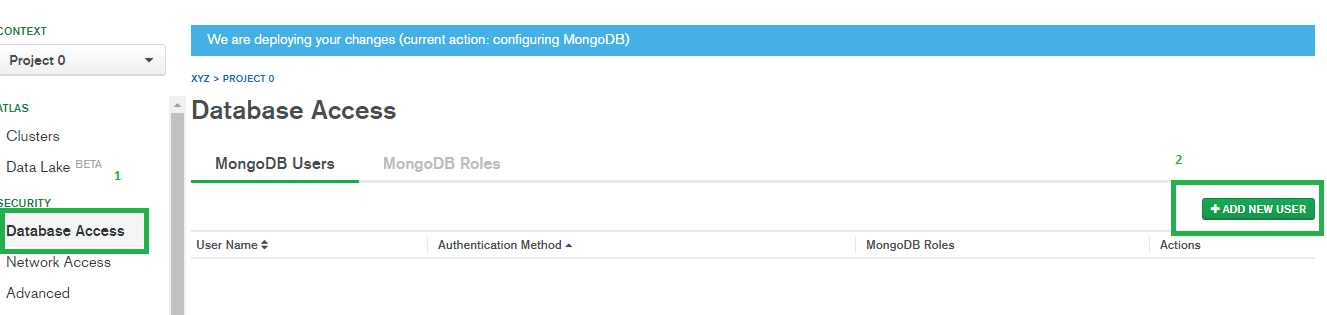
#Database
Example: # 4
Step: # 4.1
Search in google like mongodb atlas
or
https://cloud.mongodb.com/v2/5a6ccc53df9db15547ad7c68#clusters
Step: # 4.2
Step # 4.3
Step # 4.4
Step # 4.5
Step # 4.6
Step # 4.7
Step # 4.8
Step # 4.9
Step # 4.10
Step # 4.11
Step # 4.12
Connect
Step # 4.13
just copy its url
Step # 4.14
create a collections
click the insert button
Enter our Entry
Step # 4.15
Step # 4.16
Step # 4.17