Sunday, September 18, 2022

Expo Dev Environment Setup for Windows 2022

We will cover: - Installing Windows Terminal - Installing Git - Installing Expo - Installing Visual Studio Code (IDE)
Installing Windows Terminal:
 let's open microsoft store and search for windows terminal and install it, after that we can launch it.


let's test it out so if i write ls i see all the folders that they have here.
Installing Git
The Next step is to install git and we will use git both for source control management and also git bash that it comes with so let's go to https://git-scm.com/downloads.
we can download it for windows after that let's open the installation guide all right next


What changes we should do let's check the last one in order to add git bash profile to the windows terminal that we installed previously let's leave everything else by default next

Next here let's override the default branch name for new repository with main because this is the new default and the new rule to have like the main branch as main.
Alright so on this screen I'm gonna choose the third one because this one will provide me  with some unix tools and it's useful for me because i'm coming from linux and mac os and That's why i will choose this one you can also go with the recommended one it's gonna work as well as expected. let's press on the next one and let's leave it as default.


let's open our windows terminal this will automatically open a power shell but we can go on this arrow and open a git bash so let's see if it opens and here i can write git --version

I'll also set the git bash as the default so let's go to setting and default profile will be git bash save it.

 Go to Terminal and automatically open git bash.

Installing NodeJS
NodeJS is an open-source Javascript runtime environment that will help us run React Native applications. It also comes with npm which is a package manager that helps to install various packages in our applications.

We're gonna go to node js https://nodejs.org/en/
To download NodeJS go to their website and select the LTS (long term support) version.


During the installation leave everything on default except for the window below. It is very important to tick this box in order to install necessary tools automatically, otherwise you will have to do that manually.
Note - you can skip also

To test if node was installed correctly open the terminal and type node --version, which should display the version that was installed. To test if npm was installed correctly type npm --version, which accordingly will display the npm version.
- node --version
- npm --version
Installation of Expo
To install Expo CLI, you simply have to open the terminal and type npm install --global expo-cli. we need to add --global in order to install Expo CLI globally.

expo-cli --version
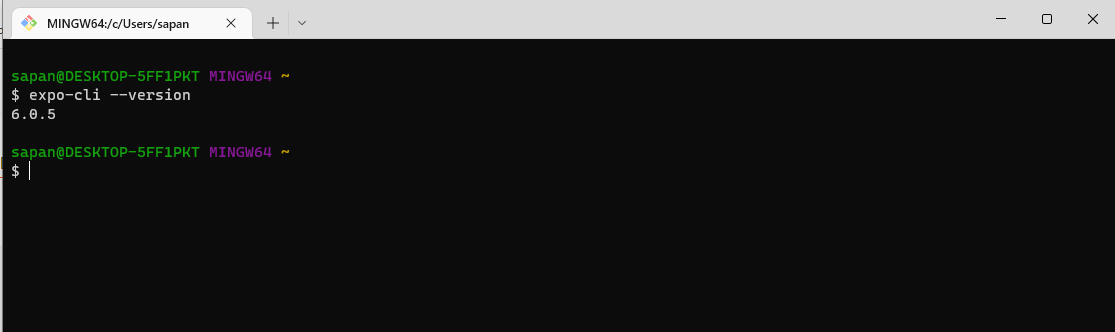
Installed successfully, let's try to initialize a project and see if everything works. Now we can create our first React Native project!
In order to create a new Expo project, in the terminal we can simply type expo init. You will be asked a few questions in order to finalise the initialisation. First of all, you will need to provide the name of your application. As it is our first application, let's name it 'myapp2'
After that, you will have to choose a template that you would like to use for your application. In this step you can choose whatever you like, but for demonstration purposes we chose blank template.
To run the application you will have to type cd myapp2 in the terminal, which will go to your project's folder and then type npm start to start the development server.
Note -Click the Turn off  Windows Firewall (it's optional) for sometimes.
Running The Application
Now it's time to run the application on your device. But in order to do that, we still need a little bit of setting up.
First things first, if you don't have an Expo account yet, we should create one on their website https://snack.expo.dev/
After creating an Expo account, you should be able to login by typing expo login in the terminal and providing your username or email as well as password. If provided credentials were correct, you should see a success message.
You can also test if you have logged in successfully by typing expo who am i, which will display your username.
Setting Up Expo Go Mobile Client
Okay, now it will get a little bit more exciting. Grab your phone and install Expo Go application from the App Store or Google Play Store. After installing the application, launch it, login with the account you have just created and launch the application that's located under RECENTLY IN DEVELOPMENT tab.


Installation of Visual Studio Code
If you decided to go with Visual Studio Code as well, then you can download it from their website https://code.visualstudio.com/
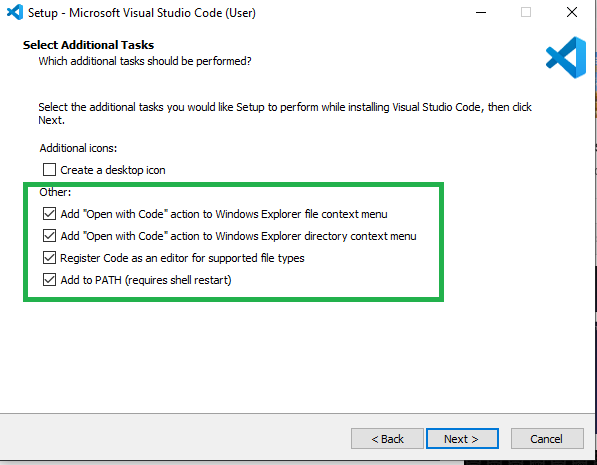
During the installation, you can make changes if you know what you are doing, otherwise I suggest leaving everything on default except for the window below. In here, tick all of the boxes under Other tab.
let's add open with code action in windows explorer in directory as well and let's register code as an editor for supported file types, let's install it

Now we can open our application on Visual Studio Code by navigating to the folder where you have created your 'myapp2' project, then clicking right mouse button anywhere on the white space and clicking Open with Code.
You might be asked to verify that you trust the authors of the files in this folder. Check the box 'Trust the authors of all files in the parent folder' and click Yes, I trust the authors button.
Open the new terminal by pressing ctrl +shift+`
From here again you can write npm start and this will do the same it will start our expo project and we will be able to run it from here.
Note -Click the Turn off  Windows Firewall (it's optional) for sometimes.

Create, Test & Debug a React Native App Using Expo
npx create-expo-app myapp
expo start --ios
expo start --android
or
npm run ios


keep learning :)


Wednesday, January 12, 2022

Fundamentals of Aquaculture

Alkalinity of water
Water alkalinity is Important for Vannamei Shrimp Farming.
- How much Bicarbonate (Hco3 or hydrogen carbonate ) percentage in water is called Alkalinity.
- If Alkalinity is 200 the pH will be stable.
- If Alkalinity is 100 or less than 100 the pH will be down.
- If Alkalinity is high, Feed intake will be problem/uneaten.
- If pH is down, Alkalinity low, Shrimp will be floating, Moulting problem
- 150 Alkalinity is okay

For Example Alkalinity is 200
 - Good - 120 to 200 or 250
 - Bad -  above 250

Alkalinity is Low
If 150 Alkalinity is Low?, So Increasing alkalinity is as easy as adding more carbonates to the water. The safest, most cost-effective, and popular product is sodium bicarbonate (aka baking soda, or bicarb).
Sodium bicarb is great for raising alkalinity and also slightly raises the pH of the water.
Dosage - Apply Soda 8kg + carbonate 15kg apply at Evening/night 

Note - Sodium bicarbonate NaHCO3 (Baking Soda), Sodium carbonate Na2CO2 (Washing soda).

Alkalinity is High
- If 150 Alkalinity is High?, So use gypsum (calcium sulfate)

Required Water Parameters
pH - 8.3
TAN  (Bottle 1 and 2 = 8 drops) = 0.25
Nitrite NO2 -( 5 drops) = 0.25
Nitrate NO3 - 5 ppm
Alkalinity 
Salanity - 2.2 ppt

Maintain good Alkalinity
- Dolamide or ClO3
-------------------------------------------------------------------------------------------------------------------------------------------------------------------------------------------------
EDTA
EDTA is a chemical used to improve water quality by reducing heavy metal concentrations.

Hardness =  How much Magnesium (Mg+2) and Calcium (Ca+2)
- If Hardness is high moulting process break down or stop
- Shell will be tight.
- End of the day will be death of Shrimp

Calculations
- 19*25 = 475 is Total Hardness.
- Hardness =  If Salinity is 2 multiplying by 250 approximately 500
- Example 2*250= 500

-------------------------------------------------------------------------------------------------------------------------------------------------------------------------------------------------
White Feces Syndrome ( WFS)
1. Vibrio loads 
2. High density 
4. Water pH and Salinity 
5. High protein heat 
6. Over Feeding
7. EHP

1. Solution for Vibrio loads 
- Exchange water upto 5 inch or  6 inch or 1/2 feet or 1 feet ( as per stocked water level)
- Use vibrio medicine (ie Elixir, triple salt, Bkc, etc)
- After that 6 or 7 hours load the water
- We cann't stop permanently, but can control it vibrio loads

Reddish color, don't moutling , long for moulting periods start  mortality

Herbal Sanitizer 
- Neem Juice + Turmeric
Preparation 
- Boil the neem leaf 
- Grinder the Turmeric 
- Collect the boil neem leaf water and Mix with Turmeric and apply the pond
-------------------------------------------------------------------------------------------------------------------------------------------------------------------------------------------------
 Solution for WFS
- Reduce Feeds
- Organic acid (Morning Meals)
- Gut probiotic (Afternoon Meals)
- 28% protin Feeds use because more protins Feeds are indigestible
- don't use Vitamin C on White feces periods
Check water pH also if water pH is High reduce it upto the pH 7.9
- Afte that use vitamin C 

Herbal Treatment for WFS
Banana and probiotic
Advantage
- Mineral deficiency problem resolve
- No Feed problem
- Vibrio Control
- Control White feces

Dosage
- Banana and gut probiotic
- Gut probiotic 10g per kg feed and Banana 100g /kg feed

Tips -1
Banana and Jaggery
One banana for per kg Feeds

Tips -2
Yogurt and Fenugreek Seed 
Procedure
- Fenugreek seed soak for over night water Thereafter Grinder it
- Fenugreek seed 15g per kg
- Curd 15g per kg
Weekly 3  to 4 days

Tips - 3
Turmeric 10 - 20g per Kg
Garlic 10 - 20g per Kg
Note - Morning Meal

Tips - 4
Tips - 5

Tips -2
- Curd + yeast 10g per kg 
Note - 3days fermentation required
- Fenugreek/ methi powder 10g per kg
use for 3 to 4 days.

Tips -2
D-white + Fitkari 
Procedure
- Dust the Fitkari and mix with water for soluble after that mix with D - white and apply the Feed and mix it , Finally dry for 30 minutes

-------------------------------------------------------------------------------------------------------------------------------------------------------------------------------------------------
Moulting
- Vibrio load
- Hardness
- High pH
- If high ph leads/create for high Ammonia
- Low DO 
- If Low Do, Shrimps Start a fresh moulting and after that shrimp will be start a hole and  in case had bad Bottom so, shrimp will be start die.

Solution for Fresh Moulting
- Water exchange
- Chek the pH  (Down/Lower pH can't be moulting)
- EDTA (2 or 3 kg per acre) + Dolamite (1/2p or 1p  Dolamite) + or may or mayn't be Soda 5kg apply at 12pm Noon and Night 8pm  apply Mineral. for Example Soda  mix -8kg, Magnesium chloride - 6kg, Calcium chloride -3kg. 4am at Morning potassium chloride 4 kg

Note - Don't use Raw mineral if have ABW 7 + or less, Try and avoid it


Next Day - BKC - 2L and apply night time - oxygen powder
Next Day - Zeolite + Gas powder
Next Day - probiotic (high Dosage)
-------------------------------------------------------------------------------------------------------------------------------------------------------------------------------------------------
SALT or Nitrite (No2) Gas
- NACL or Sodium chloride
- Remove Nitrite gas Fastly
- Salt + PP (Potassium permanganate)
- High Sodium level 

Solution for Nitrite Gas
Dosage
- Salt -25kg
- PP 300g
- Apply at day time 
or
Salt 15 to 20 kg  Apply at day time  for release Nitrite Gas
Note - If High blooms use for night time 10 to 15 kg per acres
-------------------------------------------------------------------------------------------------------------------------------------------------------------------------------------------------
Running mortality syndrome (RMS)
- Bad Bottom conditons ( ie After Moulting stage shrimp start a hole if have a bad bottom so, shrimp will be dead
- Bad water conditions
- Antennae cutting
- High No2
- Vibrio loads
- Floating dead shrimp
- Low DO
- High Blooms
- High Stocking density
- Control pH / Lower pH
- Feeds Shortage
- Dark yellow color of water
- Probiotic and Mineral shortage maybe

Solution for RMS
- RMS CARE PVS Company
-------------------------------------------------------------------------------------------------------------------------------------------------------------------------------------------------
Liver transition
- It'll be start Doc 20 to 35 
- control water parameter
- don't upload too much water

-------------------------------------------------------------------------------------------------------------------------------------------------------------------------------------------------
Turbidity or Yellow water 
- Sometimes start RMS 7 or 8 grams 
- low pH
- low Do
- low plankton density 
- RMS start, Mainly Low DO due start for RMS
- A lot gas creations
- Stop Areations Day time

Solution for Turbidity or Yellow water 
- Magnesium sulphate + Dolamite
- Soak overnight for Magnesium sulphate,  Apply at Morning time Dolamite 10kg Mix with Magnesium sulphate
 or
- Powder zeolite + Dolamite + Sand
   Regular  for 2 days
 or
- TURBI Care (PVS company) + Dolamite+ sand , it's best results
-------------------------------------------------------------------------------------------------------------------------------------------------------------------------------------------------
Rainy
- More minerals
- Add some salt water / raw salt..etc
- Potassium chloride and Magnesium chloride give us more iron
- More probiotic
- More Zeolite + Gas powder
- Reduce Feeds


-------------------------------------------------------------------------------------------------------------------------------------------------------------------------------------------------
How to control Microcystis / Blue Green Algae in Aquaculture?
- Main reason for Cyanobacteria 
Phytoplankton and Algae access to grow Reason 
1. over fertilization
2. over feeding
3. Direct sunlight

Water Types
1. Mineral turbidity 
2. Plankton turbidity 
3. Humic turbidity

2. Plankton Turbidity (Algae, green or brown of water colour)
Treatment  (Common for Old or Modern Technique)
  • Stop fertilizing
  • 40-50% feeding done
  • 25-30% Water exchange
Old Technique
Requirements 
  • Copper Sulphate
  • Dolamite
day -1
  •  Copper sulphate [1-1.5kg/acer water body] Each 200 grams tight cloths and depth 2 feet water
day -2 
  • Dolamite Lime 60-70kg/acer water body [1st dose]
- waits 2 days
- If don't well, continue 10-15kg per day/acer water body
- once water colour is cleaned then remove cloth
                                       OR
Modern Technique
Requirements
  • Bleaching powder
  • oxygen powder
  • Mineral
  • Zeolite
Day - 1
Bleaching powder, oxygen powder
  •   Apply bleaching powder 8-10kg/acer water body depending on the age and body weight of Fish.
Note - If you apply proper dose of bleaching powder then no fish mortality will shown. Mortality But you are absolutely right if we apply excess amount of bleaching powder than of course fish mortality will shown.
  •  Start aeration + add oxygen powder to your pond
Note - dead will be algae and hypo plankton

Day - 2
  • Apply Mineral Mixture in to your pond
Day  - 3
  •  Mixed Zeolite [10-15k/acer and Gas Powder and apply properly into your pond]
3. Humic turbidity (Dark Brown and Black of water colour)
Requirements
  • Zeolite
  • lime
  • Sand
Note - Carbonate or Oxide Lime is Best result
Mix well the and apply the pond 
Note - Stop the Aeration for 2 hours


 Muriatic Acid
- Most common acid in the pool industry.
- Effective for reducing pH and  total Alkalinity
- Extremely strong!

Best Gut Probiotic
-


Notes
- We cann't stop permanently, but can control it vibrio loads
- If high ph leads/create for high Ammonia
- Potassium chloride and Magnesium chloride give us more iron incase for low Salinity and use it

RMS CARE PVS CO
Mineral with magnesium chloride 5 to 6kg and potassium chloride 3 kg


Sunday, January 31, 2021

Splash Screen

Splash Screen in Flutter
Splash Screen is the first screen that we see when we run our application. It is also known as Launch Screen. We will implement basic methods to add a splash screen in our app.

Add dependencies
https://pub.dev/packages/flutter_native_splash/install
It'll dev dependencies
  flutter_native_splash: ^0.2.9


  flutter_native_splash: ^0.2.9
flutter_native_splash:
  color: "#ffffff"    //  color
  image: assets/images/download.jpg
  android: true
  ios: true


flutter clean
flutter pub get
flutter pub run flutter_native_splash:create
or
Generate Splash Screen - Single Command: 
flutter clean && flutter pub get && flutter pub run flutter_native_splash:create

Note - Google search for hex color

Full Screen Properties
android_gravity:fill
ios_content_mode: scaleAspectFill

flutter clean && flutter pub get && flutter pub run flutter_native_splash:create


Happy Coding :)
......................................................................................................................................................................................................................................
Example :#1 [ Native setup ]

Step -1. \android\app\src\main\res\drawable\
launch_image.png , put the image like that


Step -2. android\app\src\main\res\drawable
Open the launch_background.xml and uncomment item tag
android\app\src\main\res\drawable\launch_background.xml

<?xml version="1.0" encoding="utf-8"?>
<!-- Modify this file to customize your launch splash screen -->

<layer-list xmlns:android="http://schemas.android.com/apk/res/android">
    <item android:drawable="@color/background_color"/>
    <item>
        <bitmap 
                android:gravity="center" 
               android:src="@drawable/splash"/>
    </item>
</layer-list>


Step -3.  android\app\src\main\res\drawable-v21
open it android\app\src\main\res\drawable-v21\launch_background.xml and uncomment item tag

<?xml version="1.0" encoding="utf-8"?>
<!-- Modify this file to customize your launch splash screen -->
<layer-list xmlns:android="http://schemas.android.com/apk/res/android">
    <!-- <item android:drawable="?android:colorBackground" /> -->
        <!-- <item android:drawable="@android:color/white" /> -->
        <item android:drawable="@color/background_color" />


    <!-- You can insert your own image assets here -->
    <item>
        <bitmap
            android:gravity="center"
            android:src="@drawable/launch_image" />
    </item>
</layer-list>


.........................................................
Step - 4 Create a xml file under Values folder
values/colors.xml
<?xml version="1.0" encoding="utf-8"?>
<resources>
  <color name="background_color">#FFCC00</color>
</resources>


flutter clean
Almost Done :)

Other useful tag
........................................................
<item
android:width="300dp"
android:height="300dp"
android:gravity="center"
>


..................
styles.xml
<?xml version="1.0" encoding="utf-8"?>
<resources>
    <style name="LaunchTheme" parent="@android:style/Theme.Light.NoTitleBar">
        <item name="android:windowBackground">@drawable/launch_background</item>
        <item name="android:windowFullscreen">false</item>
    </style>
    <style name="NormalTheme" parent="@android:style/Theme.Light.NoTitleBar">
        <item name="android:windowBackground">?android:colorBackground</item>
    </style>
</resources>

Happy Coding :)


Saturday, January 30, 2021

Stream Videos || Flutter

 
In build.gradle:
// Put this in your buildtypes debug section:
manifestPlaceholders = [usesCleartextTraffic:"true"]

// Put this in your buildtypes release section
manifestPlaceholders = [usesCleartextTraffic:"false"]

In the application tag in AndroidManifest.xml
android:usesCleartextTraffic="${usesCleartextTraffic}"
<uses-permission android:name="android.permission.INTERNET" />

Or
It'll same work 
manifestPlaceholders = [usesCleartextTraffic:"true"]

In the application tag in AndroidManifest.xml
android:usesCleartextTraffic="${usesCleartextTraffic}"
<uses-permission android:name="android.permission.INTERNET" />


or
android:usesCleartextTraffic="true"
<uses-permission android:name="android.permission.INTERNET" />
..................................................................................................................................................................................................................................
Stream Videos in Flutter Using Video Player Library
dependencies
https://pub.dev/packages/video_player/install
  video_player: ^1.0.1

Code here

import 'package:video_player/video_player.dart';
import 'package:flutter/material.dart';

void main() => runApp(MyApp());

class MyApp extends StatefulWidget {
  @override
  _MyAppState createState() => _MyAppState();
}

class _MyAppState extends State<MyApp> {
  VideoPlayerController _controller;

  @override
  void initState() {
    super.initState();
    _controller = VideoPlayerController.network(
        'http://www.sample-videos.com/video123/mp4/720/big_buck_bunny_720p_20mb.mp4')
      ..initialize().then((_) {
        // Ensure the first frame is shown after the video is initialized, even before the play button has been pressed.
        setState(() {});
      });
  }

  @override
  Widget build(BuildContext context) {
    return MaterialApp(
      title: 'Video Demo',
      home: Scaffold(
        body: Center(
          child: _controller.value.initialized
              ? AspectRatio(
                  aspectRatio: _controller.value.aspectRatio,
                  child: VideoPlayer(_controller),
                )
              : Container(),
        ),
        floatingActionButton: FloatingActionButton(
          onPressed: () {
            setState(() {
              _controller.value.isPlaying
                  ? _controller.pause()
                  : _controller.play();
            });
          },
          child: Icon(
            _controller.value.isPlaying ? Icons.pause : Icons.play_arrow,
          ),
        ),
      ),
    );
  }

  @override
  void dispose() {
    super.dispose();
    _controller.dispose();
  }
}


Happy Coding :)
..................................................................................................................................................................................................................................
Agora
https://www.agora.io/en/

Agora-Flutter-Quickstart
https://github.com/AgoraIO-Community/Agora-Flutter-Quickstart

dependencies
https://github.com/AgoraIO-Community/Agora-Flutter-Quickstart/blob/master/pubspec.yaml
  agora_rtc_engine: ^3.1.3
  permission_handler: ^5.0.1


Happy Coding :)
..................................................................................................................................................................................................................................
Audioplayers

dependencies
https://pub.dev/packages/audioplayers/install
  audioplayers: ^0.17.3

Code Here

import 'package:audioplayers/audio_cache.dart';
import 'package:audioplayers/audioplayers.dart';
import 'package:flutter/material.dart';

void main() {
  runApp(MyApp());
}

class MyApp extends StatelessWidget {
  // This widget is the root of your application.
  @override
  Widget build(BuildContext context) {
    return MaterialApp(
      debugShowCheckedModeBanner: false,
      home: MusicApp(),
    );
  }
}

class MusicApp extends StatefulWidget {
  @override
  _MusicAppState createState() => _MusicAppState();
}

class _MusicAppState extends State<MusicApp> {
  
  bool playing = false; 
  IconData playBtn = Icons.play_arrow; 

  AudioPlayer _player;
  AudioCache cache;

  Duration position = Duration();
  Duration musicLength =Duration();

  //we will create a custom slider

  Widget slider() {
    return Container(
      width: 300.0,
      child: Slider.adaptive(
          activeColor: Colors.blue[800],
          inactiveColor: Colors.grey[350],
          value: position.inSeconds.toDouble(),
          max: musicLength.inSeconds.toDouble(),
          onChanged: (value) {
            seekToSec(value.toInt());
          }),
    );
  }

  void seekToSec(int sec) {
    Duration newPos = Duration(seconds: sec);
    _player.seek(newPos);
  }

  @override
  void initState() {
    super.initState();
    _player = AudioPlayer();
    cache = AudioCache(fixedPlayer: _player);

    _player.positionHandler = (d) {
      setState(() {
        musicLength = d;
      });
    };

   
    _player.positionHandler = (p) {
      setState(() {
        position = p;
      });
    };
  }

  @override
  Widget build(BuildContext context) {
    return Scaffold(
      
      body: Container(
        width: double.infinity,
        decoration: BoxDecoration(
          gradient: LinearGradient(
              begin: Alignment.topLeft,
              end: Alignment.bottomRight,
              colors: [
                Colors.blue[800],
                Colors.blue[200],
              ]),
        ),
        child: Padding(
          padding: EdgeInsets.only(
            top: 48.0,
          ),
          child: Container(
            child: Column(
              mainAxisAlignment: MainAxisAlignment.start,
              crossAxisAlignment: CrossAxisAlignment.start,
              children: [
               
                Padding(
                  padding: const EdgeInsets.only(left: 12.0),
                  child: Text(
                    "Music Beats",
                    style: TextStyle(
                      color: Colors.white,
                      fontSize: 38.0,
                      fontWeight: FontWeight.bold,
                    ),
                  ),
                ),
                Padding(
                  padding: EdgeInsets.only(left: 12.0),
                  child: Text(
                    "Listen to your favorite Music",
                    style: TextStyle(
                      color: Colors.white,
                      fontSize: 24.0,
                      fontWeight: FontWeight.w400,
                    ),
                  ),
                ),
                SizedBox(
                  height: 24.0,
                ),
                Center(
                  child: Container(
                    width: 280.0,
                    height: 280.0,
                    decoration: BoxDecoration(
                        borderRadius: BorderRadius.circular(30.0),
                        image: DecorationImage(
                          image: AssetImage("assets/images/download.jpg"),
                        )),
                  ),
                ),

                SizedBox(
                  height: 18.0,
                ),
                Center(
                  child: const Text(
                    "Stargazer",
                    style: TextStyle(
                      color: Colors.white,
                      fontSize: 32.0,
                      fontWeight: FontWeight.w600,
                    ),
                  ),
                ),
                SizedBox(
                  height: 30.0,
                ),
                Expanded(
                  child: Container(
                    decoration: BoxDecoration(
                      color: Colors.white,
                      borderRadius: BorderRadius.only(
                        topLeft: Radius.circular(30.0),
                        topRight: Radius.circular(30.0),
                      ),
                    ),
                    child: Column(
                      mainAxisAlignment: MainAxisAlignment.center,
                      crossAxisAlignment: CrossAxisAlignment.center,
                      children: [
                        Container(
                          width: 500.0,
                          child: Row(
                            mainAxisAlignment: MainAxisAlignment.center,
                            crossAxisAlignment: CrossAxisAlignment.center,
                            children: [
                              Text(
                                "${position.inMinutes}:${position.inSeconds.remainder(60)}",
                                style: TextStyle(
                                  fontSize: 18.0,
                                ),
                              ),
                              slider(),
                              Text(
                                "${musicLength.inMinutes}:${musicLength.inSeconds.remainder(60)}",
                                style: TextStyle(
                                  fontSize: 18.0,
                                ),
                              ),
                            ],
                          ),
                        ),
                        Row(
                          mainAxisAlignment: MainAxisAlignment.center,
                          crossAxisAlignment: CrossAxisAlignment.center,
                          children: [
                            IconButton(
                              iconSize: 45.0,
                              color: Colors.blue,
                              onPressed: () {},
                              icon: Icon(
                                Icons.skip_previous,
                              ),
                            ),
                            IconButton(
                              iconSize: 62.0,
                              color: Colors.blue[800],
                              onPressed: () {
                               
                                if (!playing) {
                                  
                                  cache.play("Stargazer.mp3");
                                  setState(() {
                                    playBtn = Icons.pause;
                                    playing = true;
                                  });
                                } else {
                                  _player.pause();
                                  setState(() {
                                    playBtn = Icons.play_arrow;
                                    playing = false;
                                  });
                                }
                              },
                              icon: Icon(
                                playBtn,
                              ),
                            ),
                            IconButton(
                              iconSize: 45.0,
                              color: Colors.blue,
                              onPressed: () {},
                              icon: Icon(
                                Icons.skip_next,
                              ),
                            ),
                          ],
                        )
                      ],
                    ),
                  ),
                ),
              ],
            ),
          ),
        ),
      ),
    );
  }
}

Happy Coding :)
..................................................................................................................................................................................................................................


..................................................................................................................................................................................................................................


Tuesday, January 26, 2021

Shared Preferences || Flutter


Shared Preferences with Flutter
Shared Preferences is one of the ways to do it. It provides a way of reading and storing such data in a key-value pair.

What is Shared Preferences?
When you're working on some client apps, you'll often come across situations, where you need to store some data in the persistent storage of devices. For example, let's say you're using some OAuth client for one of your login methods, for that you'll need to store the access token on the client's device so that the client does not have to sign in again on relaunching the app.

Adding shared_preferences in pubspec.yaml

https://pub.dev/packages/shared_preferences/install
shared_preferences: ^0.5.12+4

Please set your constraint to shared_preferences: '>=0.5.y+x <2.0.0'

In our main.dart file, Let's convert our main function to async
void main() async{
  runApp(myApp);
  await StorageService.createInstance();
}

Happy Coding :)
.................................................................................................................................................................................................................................
Example :#1


Happy Coding :)
.................................................................................................................................................................................................................................
Example :#2


Happy Coding :)

Url Launcher || Flutter

Url Launcher || Flutter 

The Url Launcher is used to launch other services
Phonebook
SMS
Email
Apps
Browser
WebView

dependencies
https://pub.dev/packages/url_launcher/install
  url_launcher: ^5.7.10

Note - 
was url launchar does not work on android 11 by If you donot add this line in manifest.xml
<uses-permission android:name="android.permission.QUERY_ALL_PACKAGES"/>

or
<manifest>

    <!-- Nest within the manifest element, not the application element-->
    <queries>
        <intent>
            <action android:name="android.intent.action.VIEW" />
            <data android:scheme="https" />
        </intent>
        <intent>
            <action android:name="android.intent.action.DIAL" />
            <data android:scheme="tel" />
        </intent>
        <intent>
            <action android:name="android.intent.action.SEND" />
            <data android:mimeType="*/*" />
        </intent>
    </queries>

    <application>
        ....
    </application>
</manifest>
........................................................................................................................................................................................................................
Example :#1
import 'package:flutter/material.dart';
import 'package:url_launcher/url_launcher.dart';

void main() {
  runApp(MyApp());
  }
  class MyApp extends StatelessWidget {
    @override
    Widget build(BuildContext context) {
      return MaterialApp(
        home: Home(),
      );
    }
  }
    class Home extends StatefulWidget {
      @override
      _HomeState createState() => _HomeState();
    }
    
    class _HomeState extends State<Home> {
      @override
      Widget build(BuildContext context) {
        return Scaffold(
          body: Center(
      child: RaisedButton(
        onPressed: _launchURL,
        child: Text('Show Flutter homepage'),
      ),
    ),
          
        );
      }
    }

_launchURL() async {
  const url = 'https://flutter.dev';
  if (await canLaunch(url)) {
    await launch(url);
  } else {
    throw 'Could not launch $url';
  }
}

Happy Coding :)
........................................................................................................................................................................................................................
Example :#2

Utils.dart
import 'package:flutter/foundation.dart';
import 'package:url_launcher/url_launcher.dart';

class Utils {
  static Future openLink({
    @required String url,
  }) =>
      _launchUrl(url);

  static Future openEmail({
    @required String toEmail,
    @required String subject,
    @required String body,
  }) async {
    final url =
        'mailto:$toEmail?subject=${Uri.encodeFull(subject)}&body=${Uri.encodeFull(body)}';

    await _launchUrl(url);
  }

  static Future openPhoneCall({@required String phoneNumber}) async {
    final url = 'tel:$phoneNumber';

    await _launchUrl(url);
  }

  static Future openSMS({@required String phoneNumber}) async {
    final url = 'sms:$phoneNumber';

    await _launchUrl(url);
  }

  static Future _launchUrl(String url) async {
    if (await canLaunch(url)) {
      await launch(url);
    }
  }
}
..................................
main.dart
import 'package:flutter/material.dart';
import 'package:urllaunchers/utils.dart';

void main() => runApp(MyApp());

class MyApp extends StatelessWidget {
  final String title = 'Url Launcher';

  @override
  Widget build(BuildContext context) => MaterialApp(
        title: title,
        theme: ThemeData(primarySwatch: Colors.deepOrange),
        home: MainPage(title: title),
      );
}

class MainPage extends StatefulWidget {
  final String title;

  const MainPage({
    @required this.title,
  });

  @override
  _MainPageState createState() => _MainPageState();
}

class _MainPageState extends State<MainPage> {
  @override
  Widget build(BuildContext context) => Scaffold(
        appBar: AppBar(
          title: Text(widget.title),
        ),
        body: Center(
          child: Column(
            mainAxisAlignment: MainAxisAlignment.center,
            children: [
              buildButton(
                text: 'Open Link',
                onClicked: () => Utils.openLink(url: 'http://flutter.dev'),
              ),
              buildButton(
                text: 'Open Email',
                onClicked: () => Utils.openEmail(
                  toEmail: 'example@gmail.com',
                  subject: 'Hello World',
                  body: 'This works great!',
                ),
              ),
              buildButton(
                text: 'Open Call',
                onClicked: () =>
                    Utils.openPhoneCall(phoneNumber: '+4912388128311'),
              ),
              buildButton(
                text: 'Open SMS',
                onClicked: () => Utils.openSMS(phoneNumber: '+4912388128311'),
              ),
            ],
          ),
        ),
      );

  Widget buildButton({
    @required String text,
    @required VoidCallback onClicked,
  }) =>
      Container(
        padding: EdgeInsets.symmetric(vertical: 12),
        child: RaisedButton(
          shape: StadiumBorder(),
          onPressed: onClicked,
          color: Colors.red,
          textColor: Colors.white,
          child: Text(
            text,
            style: TextStyle(fontSize: 24),
          ),
        ),
      );
}
Happy Coding :)
........................................................................................................................................................................................................................
Example :#3
//Add the url_laucher package in your pubspec.yaml

import 'package:flutter/material.dart';
import 'package:url_launcher/url_launcher.dart';

void main() {
  runApp(MyApp());
}

class MyApp extends StatelessWidget {
  @override
  Widget build(BuildContext context) {
    return MaterialApp(
      debugShowCheckedModeBanner: false,
      title: 'Url Launcher',
      theme: ThemeData(
        primarySwatch: Colors.blue,
        visualDensity: VisualDensity.adaptivePlatformDensity,
      ),
      home: UrlLauncher(),
    );
  }
}

class UrlLauncher extends StatefulWidget {
  @override
  _UrlLauncherState createState() => _UrlLauncherState();
}

Future<void> _launched;

//To open phonebook
Future<void> _callUsers(String url) async {
  if (await canLaunch(url)) {
    await launch(url);
  } else {
    throw 'Could not launch $url';
  }
}

//To open Messaging app
Future<void> _smsUsers(String url) async {
  if (await canLaunch(url)) {
    await launch(url);
  } else {
    throw 'Could not launch $url';
  }
}

//To open email/gmail
Future<void> _mailUsers(String url) async {
  if (await canLaunch(url)) {
    await launch(url);
  } else {
    throw 'Could not launch $url';
  }
}

//To open installed app in the device
Future<void> _launchUniversalLinkIos(String url) async {
  if (await canLaunch(url)) {
    final bool nativeAppLaunchSucceeded = await launch(
      url,
      forceSafariVC: false,
      universalLinksOnly: true,
    );
    if (!nativeAppLaunchSucceeded) {
      await launch(
        url,
        forceSafariVC: true,
      );
    }
  }
}

//To open link in browser
Future<void> _launchInBrowser(String url) async {
  if (await canLaunch(url)) {
    await launch(url);
  } else {
    throw 'Could not launch $url';
  }
}

//To open link in webView
Future<void> _launchInWebView(String url) async {
  if (await canLaunch(url)) {
    await launch(
      url,
      forceSafariVC: true,
      forceWebView: true,
      headers: <String, String>{'my_header_key': 'my_header_value'},
    );
  } else {
    throw 'Could not launch $url';
  }
}

class _UrlLauncherState extends State<UrlLauncher> {
  @override
  Widget build(BuildContext context) {
    return Scaffold(
      body: GridView.count(
        crossAxisCount: 2,
        children: <Widget>[
          LauncherButton(
            color: Color(0xffF3D180),
            icon: Icons.phone,
            text: 'Phone',
            onPress: () => setState(() {
              _launched = _callUsers('tel:95521515');
            }),
          ),
          LauncherButton(
            color: Color(0xffFCBF49),
            icon: Icons.sms,
            text: 'SMS',
            onPress: () => setState(() {
              _launched = _smsUsers('sms:5550101234');
            }),
          ),
          LauncherButton(
            color: Color(0xffF77F00),
            icon: Icons.mail,
            text: 'Email',
            onPress: () => setState(() {
              _launched = _mailUsers(
                  'mailto:smith@example.org?subject=UrlPackage&body=It%20is%20awesome');
            }),
          ),
          LauncherButton(
            color: Color(0xffD62828),
            icon: Icons.play_arrow,
            text: 'Youtube',
            onPress: () => setState(() {
              _launched = _launchUniversalLinkIos('https://www.youtube.com/');
            }),
          ),
          LauncherButton(
            color: Color(0xff2E933C),
            icon: Icons.public,
            text: 'Brower',
            onPress: () => setState(() {
              _launched = _launchInBrowser('https://www.google.com/');
            }),
          ),
          LauncherButton(
            color: Color(0xff1B4965),
            icon: Icons.http,
            text: 'WebView',
            onPress: () => setState(() {
              _launched = _launchInWebView('https://www.google.com/');
            }),
          ),
        ],
      ),
    );
  }
}

class LauncherButton extends StatelessWidget {
  final Color color;
  final IconData icon;
  final Function onPress;
  final String text;

  const LauncherButton({this.color, this.icon, this.onPress, this.text});
  @override
  Widget build(BuildContext context) {
    return GestureDetector(
      onTap: onPress,
      child: Padding(
        padding: const EdgeInsets.all(20.0),
        child: Container(
          decoration: BoxDecoration(
            color: color,
            borderRadius: BorderRadius.circular(
              25.0,
            ),
          ),
          child: Column(
            mainAxisAlignment: MainAxisAlignment.center,
            children: <Widget>[
              Icon(
                icon,
                size: 60,
                color: Colors.white,
              ),
              Text(
                text,
                style: TextStyle(
                  height: 2,
                  fontSize: 20,
                  color: Colors.white,
                ),
              ),
            ],
          ),
        ),
      ),
    );
  }
}
Happy Coding:)
........................................................................................................................................................................................................................
Example :#4