......................................................................................................................................................................................................................................
Example : #1[ Basic Commands ]
flutter build apk --build-name=1.0.1 --build-number=2
flutter clean
flutter build appbundle --target-platform android-arm,android-arm64
or
flutter build appbundle --target-platform android-arm,android-arm64,android-x64.
For splitting the apks, we run the command
flutter build apk --split-per-abi.
This should reduce the app size significantly.
Finaly we can use below one command
flutter build apk
We can reduce the apk size by splitting it for required ABIs
flutter build apk --target-platform android-arm,android-arm64,android-x64 --split-per-abi
Debug
keytool -list -v -alias androiddebugkey -keystore C:\Users\sapan\.android\debug.keystore
Happy coding :)
......................................................................................................................................................................................................................................
......................................................................................................................................................................................................................................
Example : #2[ how to generate a release apk for Android in Flutter ]
More info
https://flutter.dev/docs/deployment/android
1. Generate keystore
Every app needs to be digitally signed by its own keystore ( .jks file) before being uploaded to Google or Apple.
Run the project directory/root project following command to generate your keystore on Windows
keytool -genkey -v -keystore C:\Users\sapan\.android\key.jks -storetype JKS -keyalg RSA -keysize 2048 -validity 10000 -alias key
2. Create keystore properties file
Create a new file {project-root}/android/key.properties
storePassword=<password from previous step>
keyPassword=<password from previous step>
keyAlias=key
storeFile=<location of the key store file, such as /Users/<user name>/key.jks>
Note : / slash in very importance.

or use \\

3. Update build.gradle
1. Set compileSdkVersion, minSdkVersion , and targetSdkVersion to 29. See the documentation for correct Android versioning
2. Open {project-root}/android/app/build.gradle
Note - Add code before android block
   def keystoreProperties = new Properties()
   def keystorePropertiesFile = rootProject.file('key.properties')
   if (keystorePropertiesFile.exists()) {
       keystoreProperties.load(new FileInputStream(keystorePropertiesFile))
   }
4. With the signing configuration info
signingConfigs {
release {
keyAlias keystoreProperties['keyAlias']
keyPassword keystoreProperties['keyPassword']
storeFile keystoreProperties['storeFile'] ? file(keystoreProperties['storeFile']) : null
storePassword keystoreProperties['storePassword']
}
}
buildTypes {
release {
signingConfig signingConfigs.release
}
}

5. Build and upload APK to Google Play
Run this in command line in your project root flutter clean && flutter build appbundle --release, this could take up to 10 minutes, don't freak out.
Note - √ Built build\app\outputs\bundle\release\app-release.aab (15.4MB).
or reduce apk only
flutter build apk --split-per-abi
Note √ Built build\app\outputs\flutter-apk\app-armeabi-v7a-release.apk (5.1MB).
or
flutter build apk --target-platform android-arm,android-arm64,android-x64 --split-per-abi
Note - √ Built build\app\outputs\flutter-apk\app-armeabi-v7a-release.apk (5.1MB).
or flutter build apk --analyze-size --target-platform android-arm64

C:\Users\sapan\Desktop\Flutter\login_demo\build\app\outputs\flutter-apk

Common Error
1.
1.

2. Gradle version ( like classpath )
3. release key instead of debug key
4. INTERNET permission
5. clearCache permission
5. clearCache permission
In build.gradle:
// Put this in your buildtypes debug section:
manifestPlaceholders = [usesCleartextTraffic:"true"]
// Put this in your buildtypes release section
manifestPlaceholders = [usesCleartextTraffic:"false"]
In the application tag in AndroidManifest.xml
android:usesCleartextTraffic="${usesCleartextTraffic}"
6. multidexEnabled true
7. min sdk 29
7. min sdk 29
8. cd android && gradlew signinReport // debug key generates
9. package name should be unique
10.
<uses-permission android:name="android.permission.INTERNET" />
<uses-permission android:name="android.permission.ACCESS_NETWORK_STATE" />
<uses-permission android:name="android.permission.ACCESS_COARSE_LOCATION" />
<uses-permission android:name="android.permission.ACCESS_FINE_LOCATION" />
<uses-permission android:name="android.permission.ACCESS_BACKGROUND_LOCATION" />
11. Create Flutter Project For AppStores - Package Name & Bundle Identifier
12. Note -
was url launchar does not work on android 11 by If you donot add this line in manifest.xml
<uses-permission android:name="android.permission.QUERY_ALL_PACKAGES"/>
or
<manifest>
<!-- Nest within the manifest element, not the application element-->
<queries>
<intent>
<action android:name="android.intent.action.VIEW" />
<data android:scheme="https" />
</intent>
<intent>
<action android:name="android.intent.action.DIAL" />
<data android:scheme="tel" />
</intent>
<intent>
<action android:name="android.intent.action.SEND" />
<data android:mimeType="*/*" />
</intent>
</queries>
<application>
....
</application>
</manifest>
13.
.......................................................................................................................................................................................................................


......................................................................................................................................................................................................................................
Example : #3 [ Build and release an Android app ]
Example : #3 [ Build and release an Android app ]
official doc
https://flutter.dev/docs/deployment/android
Go to Google play developer console and open it
https://play.google.com/apps/publish
click the create app button

Enter the app name and continue..


Add Countries


Dashboards

App access


Content rating


Target audience


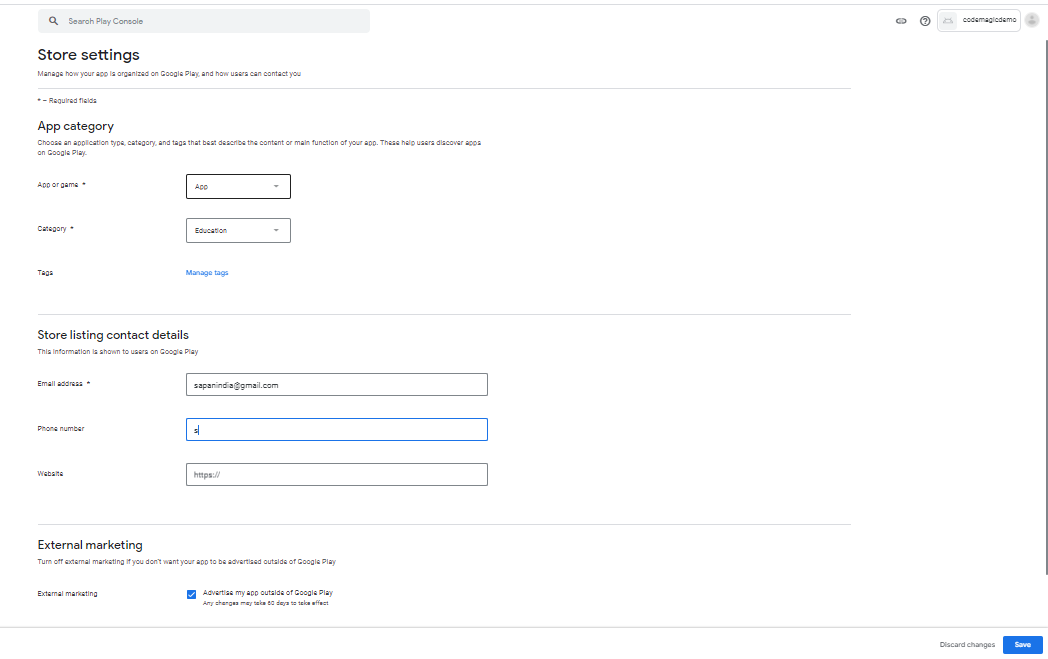
Select app category and provide contact details


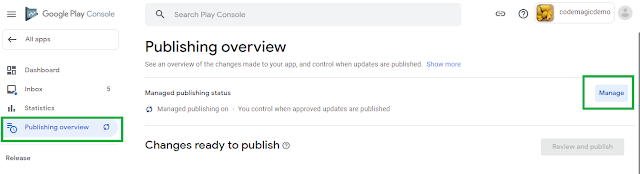

Check out the Given below one links


Set up your store listing

Publishing overview


Published App Url
https://play.google.com/store/apps/details?id=com.sapan.codemagicdemo
Happy Coding :)
......................................................................................................................................................................................................................................
Example : #4 [ Android icon generator ]
Example : #4 [ Android icon generator ]
Check out the Given below one links
https://romannurik.github.io/AndroidAssetStudio/icons-launcher.html#foreground.type=clipart&foreground.clipart=android&foreground.space.trim=1&foreground.space.pad=0.25&foreColor=rgba(96%2C%20125%2C%20139%2C%200)&backColor=rgb(68%2C%20138%2C%20255)&crop=0&backgroundShape=square&effects=none&name=ic_launcher
Click the Image Tab and upload the image

Select Color
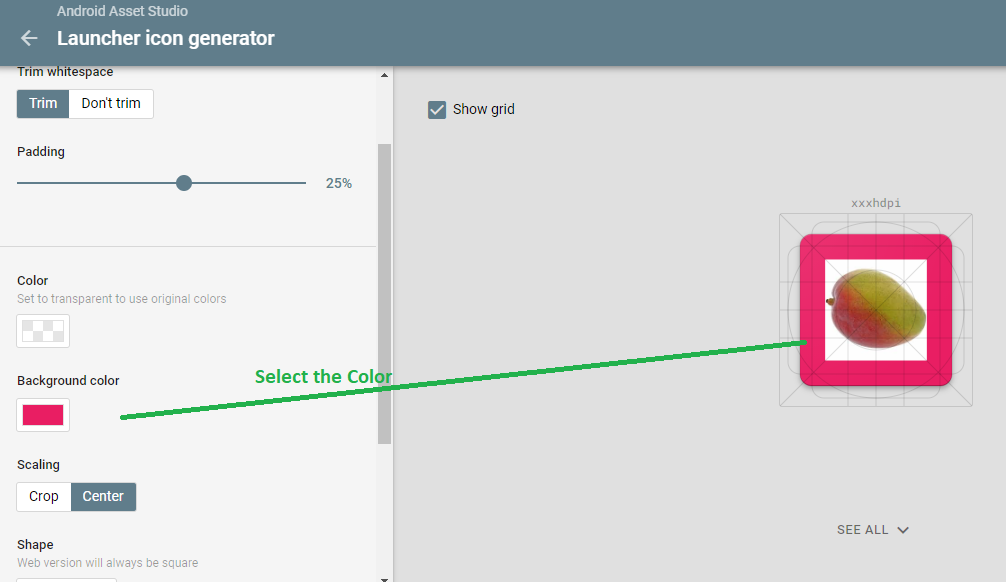
Download and Extract it

Go to root project and follow the path
C:\Users\sapan\Desktop\Flutter\codemagicdemo\android\app\src\main\res
copy and paste there.
Note - only starting "mipmap" folder will be delete, that is old one and paste it new generated one


Happy Coding :)
......................................................................................................................................................................................................................................
Example : #5 [ iOS icon generator ]
Example : #5 [ iOS icon generator ]
https://appicon.co/

No comments:
Post a Comment