Sunday, September 27, 2020

Custom Clipper | Flutter Tutorials


Make Custom Clipper for your Application | Flutter Tutorials

Flutter comes with a different widget like ClipRect, ClipRRect, and ClipOval which are useful to create custom shapes but we can only create few shapes using that, while we can create any type of shapes using the ClipPath.
I will talk about creating a custom path using CustomClipper and use it in ClipPath.
..................................................................................................................................................................................................................
Example :#1 [ Custom Clipper ]
ClipPath

ClipPath is used to create a very custom widget of any shape. ClipPath has a clipper property that requires a custom clipper.
@override
Widget build(BuildContext context) {
  return Scaffold(
    backgroundColor: Colors.grey,
    body: Center(
      child: ClipPath(
        clipper: MyCustomClipper(),
        child: Container(
          width: 200,
          height: 200,
          color: Colors.pink,
        ),
      ),
    ),
  );
}
...................................
To create a custom clipper, you need to create a class that extends CustomClipper<Path>
and must override two methods.

class MyCustomClipper extends CustomClipper<Path> {
  @override
  Path getClip(Size size) {
    Path path = Path();
    return path;
  }

  @override
  bool shouldReclip(CustomClipper<Path> oldClipper) => false
}
...................................
Code Here
import 'package:flutter/material.dart';
import 'package:sapan/pages/home.dart';

void main() {
  runApp(MyApp());
}

class MyApp extends StatelessWidget {
  @override
  Widget build(BuildContext context) {
    return MaterialApp(
      debugShowCheckedModeBanner: false,
      home: Homes(),
    );
  }
}

class Homes extends StatefulWidget {
  @override
  _HomesState createState() => _HomesState();
}

class _HomesState extends State<Homes> {
  @override
  Widget build(BuildContext context) {
    return Scaffold(
        body: Center(
      child: Column(
        mainAxisAlignment: MainAxisAlignment.center,
        children: [
          ClipPath(
            clipper: MyCliper(),
            child: Image.asset("assets/images/original.jpeg",
             fit: BoxFit.cover),
          )
        ],
      ),
    ));
  }
}

class MyCliper extends CustomClipper<Path> {
  @override
  Path getClip(Size size) {
    var path = Path();
    path.lineTo(0.0, size.height);
    path.lineTo(size.width, 0.0);
    path.close();
    return path;
  }

  @override
  bool shouldReclip(covariant CustomClipper<Path> oldClipper) => false;
}


Basic Info

Happy Coding :)
..................................................................................................................................................................................................................
Example :#2
import 'package:flutter/material.dart';
import 'package:sapan/pages/home.dart';

void main() {
  runApp(MyApp());
}

class MyApp extends StatelessWidget {
  @override
  Widget build(BuildContext context) {
    return MaterialApp(
      debugShowCheckedModeBanner: false,
      home: Homes(),
    );
  }
}

class Homes extends StatefulWidget {
  @override
  _HomesState createState() => _HomesState();
}

class _HomesState extends State<Homes> {
  @override
  Widget build(BuildContext context) {
    return Scaffold(
        body: Center(
      child: Column(
        mainAxisAlignment: MainAxisAlignment.center,
        children: [
          ClipPath(
            clipper: MyCliper(),
            child: Image.asset("assets/images/original.jpeg",
             fit: BoxFit.cover),
          )
        ],
      ),
    ));
  }
}

class MyCliper extends CustomClipper<Path> {
  @override
  Path getClip(Size size) {
    var path = Path()
    ..lineTo(0.0, size.height)
    ..lineTo(size.width, size.height)
    ..close();
    return path;
  }

  @override
  bool shouldReclip(covariant CustomClipper<Path> oldClipper) => false;
}


@override
Path getClip(Size size) {

  Path path = Path()
    ..lineTo(0, size.height) // Add line p1p2
    ..lineTo(size.width, size.height) // Add line p2p3
    ..close();
  
  return path;
}

Happy Coding :)
..................................................................................................................................................................................................................
Example :#3


Happy Coding :)
..................................................................................................................................................................................................................
Example :#4
import 'package:flutter/material.dart';
import 'package:flutter_custom_clippers/flutter_custom_clippers.dart';

void main() async {
  SystemChrome.setSystemUIOverlayStyle(
  SystemUiOverlayStyle(statusBarColor: Colors.green));
  runApp(MyApp());
}

class MyApp extends StatelessWidget {
  @override
  Widget build(BuildContext context) {
    return MaterialApp(
      home: Home(
        title: 'Home',
      ),
    );
  }
}


class Home extends StatefulWidget {
  Home({Key key, this.title}) : super(key: key);
  final String title;
  @override
  HomeState createState() => HomeState();
}


class HomeState extends State<Home> {
  @override
  Widget build(BuildContext context) {
    return Scaffold(
        appBar: AppBar(
          title: Text(widget.title),
        ),
        body: ListView(
          padding: EdgeInsets.all(20.0),
          children: [
            ClipPath( 
              clipper: WaveClipperOne(reverse: false), 
              child: Container(  
                height: 100,
                color: Colors.cyan,
                child: Text('Text 1'),
              ),
            ),
            ClipPath( 
              clipper: WaveClipperTwo(),
              child: Container(  
                height: 100,
                color: Colors.deepOrange,
                child: Text('Text 2'),
              ),
            ),
            ClipPath( 
              clipper: OvalBottomBorderClipper(),
              child: Container(  
                height: 100,
                color: Colors.deepOrange,
                child: Text('Text 2'),
              ),
            ),
            ClipPath( 
              clipper: OvalRightBorderClipper(),
              child: Container(  
                height: 100,
                color: Colors.deepOrange,
                child: Text('Text 2'),
              ),
            ),
            ClipPath( 
              clipper: ArcClipper(),
              child: Container(  
                height: 100,
                color: Colors.deepOrange,
                child: Text('Text 2'),
              ),
            ),
            ClipPath( 
              clipper: WaveClipperTwo(),
              child: Container(  
                height: 100,
                color: Colors.deepOrange,
                child: Text('Text 2'),
              ),
            ),
            ClipPath( 
              clipper: MovieTicketClipper(),
              child: Container(  
                height: 100,
                color: Colors.deepOrange,
                child: Text('Text 2'),
              ),
            ),
            ClipPath( 
              clipper: MovieTicketBothSidesClipper(),
              child: Container(  
                height: 100,
                color: Colors.green,
                child: Text('Text 2'),
              ),
              
            ),
            ClipPath( 
              clipper: MultiplePointedEdgeClipper(),
              child: Container(  
                height: 100,
                color: Colors.deepOrange,
                child: Text('Text 2'),
              ),
            ),
            ClipPath( 
              clipper: OvalTopBorderClipper(),
              child: Container(  
                height: 100,
                color: Colors.deepOrange,
                child: Text('Text 2'),
              ),
            ),
          ],
        ));
  }
}
Happy Coding:)
..................................................................................................................................................................................................................
Example :#3


Saturday, September 26, 2020

BLoC pattern | Provider | Flutter

How to handle state in Flutter using the BLoC pattern
The Business Logic Component (BLoC) pattern is a pattern created by Google and announced at Google I/O ’18. 

A BLoC has two simple components: 
Sinks and Streams, both of which are provided by a StreamController. You add streams of event/data input into a Sink and listen to them as streams of data output through a Stream.

Provider, an incredible state management library, that is simpler to use, better to manage and easier to understand than using Bloc’s! :)
 ..........................................................................................................................................................................................................................
import 'dart:async';

class CounterBloc {
  final counterController = StreamController();                    // create a StreamController or
 Stream get getCount => counterController.stream;            // create a getter for our Stream


  void updateCount() {
    counterController.sink.add(data);                            // add whatever data we want into the Sink
  }
  

  void dispose() {
    counterController.close();                         // close our StreamController to avoid memory leak
  }
}

final bloc = CounterBloc();                           // create an instance of the counter bloc
//======= end of CounterBloc file
...........................................................


import 'counter_bloc.dart'; 

@override
void dispose() {
  bloc.dispose();                                    // call the dispose method to close our StreamController
  super.dispose();
}


@override
Widget build(BuildContext context) {
  return StreamBuilder(                       // Wrap our widget with a StreamBuilder
    stream: bloc.getCount,                  // pass our Stream getter here
    initialData: 0,                               // provide an initial data
    builder: (context, snapshot) => Text('${snapshot.data}'), // access the data in our Stream here
  );
}

A BLoC is a simple Dart class. 
we created a CounterBloc class and in it, a StreamController which we called counterController. We created a getter for our Stream called getCount, an updateCount method that adds data into our Sink when called, and a dispose method to close our StreamController.

To access the data in our Stream, we created a StreamBuilder widget and passed our Stream to its stream property and accessed the data in its builder function.

  Now, our BLoC is receiving and streaming data. We can access that data and display it on a screen through a StreamBuilder. We wrap whatever widget that needs the data in a StreamBuilder widget and pass the stream containing the data to it. Add the following code to the counter.dart file
.........................................................................................................................................................................................................................
Example : #1

counter_event.dart

enum CounterEvent {
  increment,
  decrement
}

.........................................
counter_bloc.dart

import 'package:flutter_bloc/flutter_bloc.dart';
import 'package:helloworld/src/events/counter_event.dart';

class CounterBloc extends Bloc<CounterEvent, int> {
  @override
  CounterBloc(int initialState) : super(0);

  @override
  int get initialState => 0;

  @override
  Stream<int> mapEventToState(CounterEvent event) async* {
   print(state); // this is current state
    switch (event) {
      case CounterEvent.increment:
        var newState = state + 1;
        yield newState;
        break;
      case CounterEvent.decrement:
      var newState = state -1;
        yield newState;
        break;
    }
  }
}
.............................
counter_page.dart

import 'package:flutter/material.dart';
import 'package:flutter_bloc/flutter_bloc.dart';
import 'package:helloworld/src/blocs/counter_bloc.dart';
import 'package:helloworld/src/events/counter_event.dart';

class Counterpage extends StatelessWidget {
  @override
  Widget build(BuildContext context) {
    final CounterBloc counterBloc = context.bloc<CounterBloc>();

    return Scaffold(
      body: SafeArea(child: BlocBuilder<CounterBloc, int>(
        builder: (context, counter) {
          return Column(
            mainAxisAlignment: MainAxisAlignment.start,
            crossAxisAlignment: CrossAxisAlignment.start,
            children: [
              Container(
                margin: EdgeInsets.all(15.0),
                child: FlatButton(
                  onPressed: () {
                    counterBloc.add(CounterEvent.increment);
                  },
                  child: Text('Increment {+}'),
                ),
                decoration: BoxDecoration(color: Colors.green),
              ),
              Text('Result $counter'),
              Container(
                margin: EdgeInsets.all(15.0),
                child: FlatButton(
                  onPressed: () {
                    counterBloc.add(CounterEvent.decrement);
                  },
                  child: Text('Increment {-}'),
                ),
                decoration: BoxDecoration(color: Colors.amber),
              ),
            ],
          );
        },
      )),
    );
  }
}
main.dart

import 'package:flutter/material.dart';
import 'package:flutter_bloc/flutter_bloc.dart';
import 'package:helloworld/src/blocs/counter_bloc.dart';
import 'package:helloworld/src/pages/counterPage.dart';

void main() {
  runApp(MyApp());
}

class MyApp extends StatelessWidget {
  @override
  Widget build(BuildContext context) {
    return MaterialApp(
      title: 'Flutter Demo',
      theme: ThemeData(
        primarySwatch: Colors.blue,
        visualDensity: VisualDensity.adaptivePlatformDensity,
      ),
      home: BlocProvider<CounterBloc>( 
        create: (context) => CounterBloc(0),
        child: Counterpage(),
      )
    );
  }
}

class MyHomePage extends StatefulWidget {
  MyHomePage({Key key, this.title}) : super(key: key);
  final String title;
  @override
  _MyHomePageState createState() => _MyHomePageState();
}

class _MyHomePageState extends State<MyHomePage> {
  int _counter = 0;
  void _incrementCounter() {
    setState(() {
      _counter++;
    });
  }

  @override
  Widget build(BuildContext context) {
    return Scaffold(
      appBar: AppBar(
        title: Text(widget.title),
      ),
      body: Center(
        child: Column(
          mainAxisAlignment: MainAxisAlignment.center,
          children: <Widget>[
            Text(
              'You have pushed the button this many times:',
            ),
            Text(
              '$_counter',
              style: Theme.of(context).textTheme.headline4,
            ),
          ],
        ),
      ),
    );
  }
}


Happy Coding ;)
.........................................................................................................................................................................................................................
Example : #2 [Bloc Counter without library ]
import 'dart:async';

import 'package:flutter/material.dart';

void main() {
  runApp(MyApp());
}

class MyApp extends StatelessWidget {
  @override
  Widget build(BuildContext context) {
    return MaterialApp(
      home: Home(),
    );
  }
}

class Home extends StatefulWidget {
  @override
  _HomeState createState() => _HomeState();
}

class _HomeState extends State<Home> {
  CounterBloc counterBloc = CounterBloc();
  // @override
  // void initState() {
  //   counterBloc;
  //   super.initState();
  // }

  @override
  void dispose() {
    super.dispose();
    counterBloc.dispose();
  }

  @override
  Widget build(BuildContext context) {
    print('Every time Build Method is called');
    return Scaffold(
        appBar: AppBar(
          title: Text('hello'),
        ),
        floatingActionButton: FloatingActionButton(
          child: Icon(Icons.add),
          onPressed: () {
            counterBloc.increment();
          },
        ),
        body: Center(
          child: StreamBuilder(
            initialData: 0,
            stream: counterBloc.getStream(),
            builder: (context, snapshot) {
              return Text(
                '${snapshot.data}',
                style: Theme.of(context).textTheme.headline2,
              );
            },
          ),
        ));
  }
}

class CounterBloc {
  StreamController<int> controller = StreamController<int>();

  int value = 0;
  
  void increment() {
    value++;
    controller.sink.add(value);
  }

  Stream<int> getStream() {
    return controller.stream;
  }

  void dispose() {
    controller.close();
  }
}
Happy Coding :)
.........................................................................................................................................................................................................................
Example : #3

import 'package:flutter/material.dart'; import 'dart:async'; void main()=>runApp( MaterialApp(home: MyApp(),)); class MyApp extends StatefulWidget { MyApp({Key key, this.title}):super(key:key); final String title; @override MyAppState createState() => MyAppState(); } class MyAppState extends State<MyApp>{ int _Counter=0; final StreamController<int> myStream =StreamController<int>(); @override void dispos(){ super.dispose(); myStream.close(); } @override Widget build(BuildContext context){ return Scaffold( appBar: AppBar( title: Text('Hello World'), ), body: Center( child: StreamBuilder( stream: myStream.stream, initialData: _Counter, builder:(BuildContext contex, AsyncSnapshot<int>snap) { return Text("I got it ${snap.data} times", style: TextStyle(fontSize: 40),); }, ), ), floatingActionButton: FloatingActionButton( onPressed: (){ myStream.sink.add(++ _Counter); }, child: Icon(Icons.add), ), ); } }
Happy Coding :)
.........................................................................................................................................................................................................................
Example : #4  [ Provider Counter Example ]
import 'package:flutter/material.dart';
import 'package:provider/provider.dart';

void main() {
  runApp(MyApp());
}

class MyApp extends StatelessWidget {
  @override
  Widget build(BuildContext context) {
    return MultiProvider(
      providers: [
        ChangeNotifierProvider.value(
          value: Counter(),
        ),
      ],
      child: MaterialApp(
        title: 'Flutter Demo',
        theme: ThemeData(
          primarySwatch: Colors.blue,
          visualDensity: VisualDensity.adaptivePlatformDensity,
        ),
        home: MyHomePage(title: " Provider Pattern"),
      ),
    );
  }
}

class MyHomePage extends StatefulWidget {
  final String title;
  MyHomePage({this.title});

  @override
  _MyHomePageState createState() => _MyHomePageState();
}

class _MyHomePageState extends State<MyHomePage> {
  void _incrementCounter(BuildContext context) {
    Provider.of<Counter>(context, listen: false).incrementCounter();
  }

  @override
  Widget build(BuildContext context) {
    var counter = Provider.of<Counter>(context).getCounter;
    return Scaffold(
      appBar: AppBar(
        title: Text(widget.title),
      ),
      body: Center(
        child: Column(
          mainAxisAlignment: MainAxisAlignment.center,
          children: <Widget>[
            Text(
              'You have pushed the button this many times:',
            ),
            Text(
              '$counter',
              style: Theme.of(context).textTheme.headline4,
            ),
          ],
        ),
      ),
      floatingActionButton: FloatingActionButton(
        onPressed: () => _incrementCounter(context),
        tooltip: 'Increment',
        child: Icon(Icons.add),
      ),
    );
  }
}

class Counter extends ChangeNotifier {
  var _count = 0;

  int get getCounter {
    return _count;
  }

  void incrementCounter() {
    _count += 1;
    notifyListeners();
  }
}
..................................................
Clean Code 
import 'package:flutter/material.dart';
import 'package:provider/provider.dart';

void main() {
  runApp(MyApp());
}

class MyApp extends StatelessWidget {
  @override
  Widget build(BuildContext context) {
    return MultiProvider(
      providers: [
        ChangeNotifierProvider(create: (_)=>ClounterApp()),
      ],
      child: MaterialApp(
        home: Home(),
      ),
    );
  }
}

class Home extends StatefulWidget {
  @override
  _HomeState createState() => _HomeState();
}

class _HomeState extends State<Home> {
  Future<void> increment() async {
    Provider.of<ClounterApp>(context, listen: false).counterrbyOne();
  }

  @override
  Widget build(BuildContext context) {
    var c = Provider.of<ClounterApp>(context).getCounter;
    return Scaffold(
      appBar: AppBar(
        title: const Text("Provider"),
      ),
      floatingActionButton: FloatingActionButton(
        onPressed: () => increment(),
        child: const Icon(Icons.add),
      ),
      body: Center(
        child: Text(
          "$c",
          style: const TextStyle(fontSize: 50),
        ),
      ),
    );
  }
}

class ClounterApp extends ChangeNotifier {
  int count = 0;
  int get getCounter => count;
  
  Future<void> counterrbyOne()async {
    count++;
    notifyListeners();
  }
}

Happy Coding;)
.........................................................................................................................................................................................................................
Example : #5


Happy Coding;)
.........................................................................................................................................................................................................................
Example : #6


Happy Coding;)
.........................................................................................................................................................................................................................
Example : #7

Happy Coding;)


Sunday, September 20, 2020

A ROADMAP TO LEARN FLUTTER

1. DART

  • Basics
  • Arrays, Maps
  • Classes
  • Play on Dart Compiler
  • String Interpolations
  • Futures...

2. Flutter Installation First App

  • Flutter Installation
  • Basic Structure
  • Android Directory Structure
  • iOS Directory Structure

3. Widgets Widgets

  • Text
  • Buttons
  • Appbar
  • Bottom Nav
  • Assets, Fonts

4. Stateless(or) Stateful

  • Difference
  • when To use?
  • How to use?
  • Add Some Functionality

5. Navigations

  • Navigator
  • Routes
  • push, pop, push and remove
  • Bottom Navigations
  • Drawer
  • Create Multipage App

6. Theory

  • Flutter -Inside View
  • DART
  • Skia Engine
  • Performance
  • Comparison
  • App Built In Flutter

7. More Widgets

  • Layouts
  • Dynamic Builders
  • Scrolling
  • Padding, Margin, Divider, SizeBox
  • Containers, Cards
  • THIRD PARTY PLUGINS

8. Local Persistent Storage

  • Shared Preferences
  • Hive
  • SQFLITE
  • JSON
  • JSON - PARSING

9. State Management

  • setState
  • inherited Widget
  • Provides
  • REDUX
  • BLOC

10. Firebase

  • Setup
  • Cloud FireStore DB
  • Streams
  • Authentications
  • Real time DB
  • File/Image Upload

11. HTTP REQUESTS

  • http
  • handling Internet
  • POST Data
  • Multipart File/image Upload
  • Download
  • DIO

12. UI PRO

  • Recreate Apps
  • Animations
  • Dribble -APP UI
  • Custom Widgets

13. Native Components

  • Native Share
  • permissions
  • Local Storage
  • Bluetooth
  • WIFI
  • IR Sensor

14. API - REST/GRAPH

  • Consume API
  • Basics of Web DEV
  • Server                      
...................................................................................................................................................................................................................................

Programming Language
  • Dart
IDE for development
  • VSCode
  • Android Studio
  • intellij
User Interface
  • Widgets
  • statefull widget
  • stateless widget
  • accessibility
  • Inherited widget
              Theming
               Localization

Style
  • Material
  • Cupertion
Assets
  • fonts
  • images
  • svg
  • audio
  • video
Static User Interface

View
  • Text,
  • Image
  • button 
  • raised button etc
ViewGroup
  • Container 
  • Row 
  • Column 
  • Stack 
  • Expanded 
  • ConstrainedBox

Dynamic User Interface
  • ListView
  • GridView
  • ExpansionTitle
Animation
  • AnimatedWidget
  • AnimatedBuilder
  • AnimationController
  • CurvedAnimation
  • Hero
  • Transform
  • Opacity
Sotrage
  • shared preference
  • file storage
  • sqlite
3rd party libararies
  • http
  • dio
  • get_it
  • cached_network_image
  • Flutter_webview_plug-in
  • font_awesome_flutter
  • SQFLite
  • rxdart
  • bloc_pattern
Behavior Components
  • Permission
  • Local Notification
  • Push Notification
  • Download Manager
  • Media Playback
  • Preference
  • Sharing
State management
  • setState
  • Provider
  • Redux
  • BLoC
  • MobX
Quality Assurance

Firebase
  • Crashlytics
  • App distribution
  • Analytics
Google play beta tests
TestFlight
App Center

Version Control
  • Git
  • Github
  • Bitbucket
  • Gitlab
Firebase
  • Firebase Auth
  • Firebase database
  • Firebase Storage
  • Firebase Messaging


Friday, September 4, 2020

Flutter Apk Size Reducing || Icon generator || App rename

 ......................................................................................................................................................................................................................................
Example : #1[ Basic Commands ]

flutter build apk --build-name=1.0.1 --build-number=2

flutter clean 
flutter build appbundle --target-platform android-arm,android-arm64
or
flutter build appbundle --target-platform android-arm,android-arm64,android-x64.

For splitting the apks, we run the command
 flutter build apk --split-per-abi. 
This should reduce the app size significantly. 

Finaly we can use below one command
flutter build apk    
We can reduce the apk size by splitting it for required ABIs
flutter build apk --target-platform android-arm,android-arm64,android-x64 --split-per-abi

Debug
keytool -list -v -alias androiddebugkey -keystore C:\Users\sapan\.android\debug.keystore

Happy coding :)
......................................................................................................................................................................................................................................
Example : #2[ how to generate a release apk for Android in Flutter ]
More info 
https://flutter.dev/docs/deployment/android

1. Generate  keystore
Every app needs to be digitally signed by its own keystore ( .jks file) before being uploaded to Google or Apple.

Run the project directory/root project following command to generate your keystore on Windows

keytool -genkey -v -keystore C:\Users\sapan\.android\key.jks -storetype JKS -keyalg RSA -keysize 2048 -validity 10000 -alias key

2. Create keystore properties file
Create a new file {project-root}/android/key.properties

storePassword=<password from previous step>
keyPassword=<password from previous step>
keyAlias=key
storeFile=<location of the key store file, such as /Users/<user name>/key.jks>

Note : / slash in very importance. 


or use \\


3. Update build.gradle
1. Set compileSdkVersion, minSdkVersion , and targetSdkVersion to 29. See the documentation for correct Android versioning

2. Open {project-root}/android/app/build.gradle
Note - Add code before android block

   def keystoreProperties = new Properties()
   def keystorePropertiesFile = rootProject.file('key.properties')
   if (keystorePropertiesFile.exists()) {
       keystoreProperties.load(new FileInputStream(keystorePropertiesFile))
   }


4. With the signing configuration info

   signingConfigs {
       release {
           keyAlias keystoreProperties['keyAlias']
           keyPassword keystoreProperties['keyPassword']
           storeFile keystoreProperties['storeFile'] ? file(keystoreProperties['storeFile']) : null
           storePassword keystoreProperties['storePassword']
       }
   }

   buildTypes {
       release {
           signingConfig signingConfigs.release
       }
   }


5. Build and upload APK to Google Play
Run this in command line in your project root flutter clean && flutter build appbundle --release, this could take up to 10 minutes, don't freak out.

Note - √ Built build\app\outputs\bundle\release\app-release.aab (15.4MB).

or reduce apk only

flutter build apk --split-per-abi
Note √ Built build\app\outputs\flutter-apk\app-armeabi-v7a-release.apk (5.1MB).
or

flutter build apk --target-platform android-arm,android-arm64,android-x64 --split-per-abi
Note - √ Built build\app\outputs\flutter-apk\app-armeabi-v7a-release.apk (5.1MB).

or flutter build apk --analyze-size --target-platform android-arm64


C:\Users\sapan\Desktop\Flutter\login_demo\build\app\outputs\flutter-apk


Common Error
1. 
2. Gradle version ( like classpath )
3. release key instead of debug key
4. INTERNET permission
5. clearCache permission
In build.gradle:

// Put this in your buildtypes debug section:
manifestPlaceholders = [usesCleartextTraffic:"true"]

// Put this in your buildtypes release section
manifestPlaceholders = [usesCleartextTraffic:"false"]
In the application tag in AndroidManifest.xml

android:usesCleartextTraffic="${usesCleartextTraffic}"

6. multidexEnabled true
7. min sdk 29
8. cd android && gradlew signinReport    // debug key generates
9. package name should be unique
10.
      <uses-permission android:name="android.permission.INTERNET" />
      <uses-permission android:name="android.permission.ACCESS_NETWORK_STATE" />
      <uses-permission android:name="android.permission.ACCESS_COARSE_LOCATION" />
      <uses-permission android:name="android.permission.ACCESS_FINE_LOCATION" />
      <uses-permission android:name="android.permission.ACCESS_BACKGROUND_LOCATION" />

11. Create Flutter Project For AppStores - Package Name & Bundle Identifier
12. Note - 
    was url launchar does not work on android 11 by If you donot add this line in manifest.xml
    <uses-permission android:name="android.permission.QUERY_ALL_PACKAGES"/>

or
<manifest>

    <!-- Nest within the manifest element, not the application element-->
    <queries>
        <intent>
            <action android:name="android.intent.action.VIEW" />
            <data android:scheme="https" />
        </intent>
        <intent>
            <action android:name="android.intent.action.DIAL" />
            <data android:scheme="tel" />
        </intent>
        <intent>
            <action android:name="android.intent.action.SEND" />
            <data android:mimeType="*/*" />
        </intent>
    </queries>

    <application>
        ....
    </application>
</manifest>

13.
.......................................................................................................................................................................................................................

Default 


How to create project with organisation way


Happy coding :)
 ......................................................................................................................................................................................................................................
Example : #3 [ Build and release an Android app ]

official doc
https://flutter.dev/docs/deployment/android

Go to Google play developer console and open it 
https://play.google.com/apps/publish

click the create app button


Enter the app name and continue..


Upload apk


Add Countries


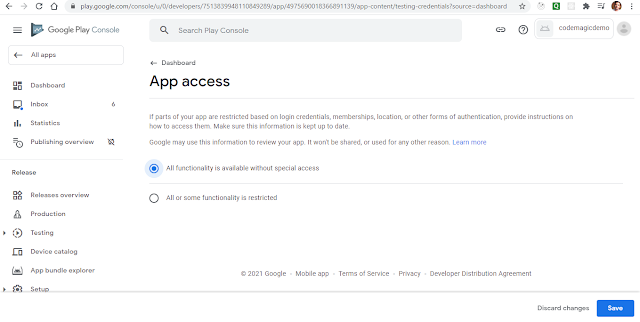
Dashboards


App access


Ads


Content rating 


Next and submit 

Target audience


..
Select app category and provide contact details


Set up your store listing


Publishing overview


Published App Url

https://play.google.com/store/apps/details?id=com.sapan.codemagicdemo

Happy Coding :)
 ......................................................................................................................................................................................................................................
Example : #4 [ Android icon generator ]

Check out the Given below one links

https://romannurik.github.io/AndroidAssetStudio/icons-launcher.html#foreground.type=clipart&foreground.clipart=android&foreground.space.trim=1&foreground.space.pad=0.25&foreColor=rgba(96%2C%20125%2C%20139%2C%200)&backColor=rgb(68%2C%20138%2C%20255)&crop=0&backgroundShape=square&effects=none&name=ic_launcher


Click the Image Tab and upload the image

Select Color


Download and Extract it


Go to root project and follow the path 
C:\Users\sapan\Desktop\Flutter\codemagicdemo\android\app\src\main\res
copy and paste there.
Note - only starting "mipmap" folder will be delete, that is old one and paste it new generated one


Happy Coding :)
 ......................................................................................................................................................................................................................................
Example : #5 [ iOS icon generator ]

https://appicon.co/