Expo
......................................................................................................................................................................................................................
Example: #1
Try Expo CLI now
official website
https://expo.io/learn
- To install Expo CLI, just run npm install -g expo-cli (or yarn global add expo-cli , whichever you prefer).
- My personal experience to recommend use git CMD or git bash and yarn global add expo-cli
FOR GLOBAL INSTALLATION ONLY, Thereafter use command prompt no problem.
for MAC
sudo npm install expo-cli --global
expo init project
Otherwise get Error, ie git related look as below
Pre-requisities


Create a new app with expo init
Common Error
Use cmd or another TTY command-line tool. Don't use git bash - it is not TTY.

My solutions is looks like below
- template flag
- name flag
template flag defines how much boilerplate the project is initiated with
the name flag defines the app name (as shown in the home screen or even in Expo itself)

Similar...

By default command prompt is cool :), looks like as below.


My recommended IDE is vscode and download the below link
https://code.visualstudio.com/
shorthand key to open project in the vscode
ie - code .

Finally run the project
ie - yarn start
or
npm start

NEXT ERROR.
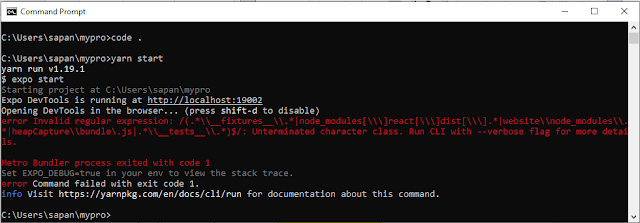
Solutions -
C:\Users\sapan\mypro\node_modules\metro-config\src\defaults\blacklist.js
copy and paste it
var sharedBlacklist = [
/node_modules[\/\\]react[\/\\]dist[\/\\].*/,
/website\/node_modules\/.*/,
/heapCapture\/bundle\.js/,
/.*\/__tests__\/.*/
];

Almost Done :)

 keep learning :)
..................................................................................................................................................................................................................................
Example: #2 [ UNINSTALL ]
uninstall expo-cli
- yarn global remove expo-cli
or
- npm -g uninstall expo-cli --save (<-- did not work for me)

keep learning :)
..................................................................................................................................................................................................................................
Example: #3 [ Navigation V4 ]
Lets start !
Now we can add react navigation into our project.
expo install react-navigation react-native-gesture-handler react-native-reanimated react-native-screens
or if you have yarn installed,
yarn add react-navigation-stack
React navigation bundled with three types of navigator
I don't want to give you more details about navigator types, you can check from documentation. We will use all three inside our app.


How to set Header Text as center ?
headerLayoutPreset:'center',

How to increase title size ?
headerTitleStyle:{
fontSize:30,
fontWeight:'bold'
},

How to change header title ?
headerTitle: 'Home',

How to change header text color ?
headerTintColor: 'red'
......................................................................................................................................................................................................................
Example: #1
official website
https://expo.io/learn
- To install Expo CLI, just run npm install -g expo-cli (or yarn global add expo-cli , whichever you prefer).
- My personal experience to recommend use git CMD or git bash and yarn global add expo-cli
FOR GLOBAL INSTALLATION ONLY, Thereafter use command prompt no problem.
for MAC
sudo npm install expo-cli --global
expo init project
Otherwise get Error, ie git related look as below

Pre-requisities
git
Node.js [download LTS only]
yarn


Create a new app with expo init
Common Error
Use cmd or another TTY command-line tool. Don't use git bash - it is not TTY.

My solutions is looks like below
- template flag
- name flag
template flag defines how much boilerplate the project is initiated with
the name flag defines the app name (as shown in the home screen or even in Expo itself)

Similar...

By default command prompt is cool :), looks like as below.


My recommended IDE is vscode and download the below link
https://code.visualstudio.com/
shorthand key to open project in the vscode
ie - code .

ie - yarn start
or
npm start

NEXT ERROR.

Solutions -
C:\Users\sapan\mypro\node_modules\metro-config\src\defaults\blacklist.js
copy and paste it
var sharedBlacklist = [
/node_modules[\/\\]react[\/\\]dist[\/\\].*/,
/website\/node_modules\/.*/,
/heapCapture\/bundle\.js/,
/.*\/__tests__\/.*/
];

Almost Done :)


..................................................................................................................................................................................................................................
Example: #2 [ UNINSTALL ]
uninstall expo-cli
- yarn global remove expo-cli
or
- npm -g uninstall expo-cli --save (<-- did not work for me)

keep learning :)
..................................................................................................................................................................................................................................
Example: #3 [ Navigation V4 ]
Lets start !
Now we can add react navigation into our project.
expo install react-navigation react-native-gesture-handler react-native-reanimated react-native-screens
or if you have yarn installed,
yarn add react-navigation-stack
React navigation bundled with three types of navigator
- StackNavigator
- TabNavigator
- DrawerNavigator
I don't want to give you more details about navigator types, you can check from documentation. We will use all three inside our app.
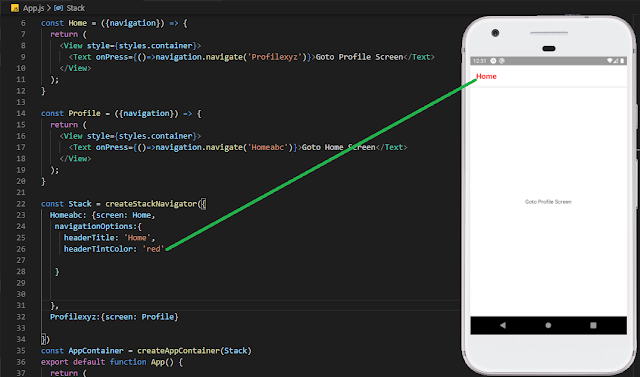
- StackNavigator
Code
import React from 'react';
import { StyleSheet, Text, View } from 'react-native';
import { createAppContainer } from 'react-navigation'
import { createStackNavigator } from 'react-navigation-stack'
const Home = ({navigation}) => {
return (
<View style={styles.container}>
<Text onPress={()=>navigation.navigate('Profilexyz')}>Goto Profile Screen</Text>
</View>
);
}
const Profile = ({navigation}) => {
return (
<View style={styles.container}>
<Text onPress={()=>navigation.navigate('Homeabc')}>Goto Home Screen</Text>
</View>
);
}
const Stack = createStackNavigator({
Homeabc: {screen: Home},
Profilexyz:{screen: Profile}
})
const AppContainer = createAppContainer(Stack)
export default function App() {
return (
<AppContainer />
);
}
const styles = StyleSheet.create({
container: {
flex: 1,
backgroundColor: '#fff',
alignItems: 'center',
justifyContent: 'center',
},
});


More details

Header Style
How to change Header backgroundColor ?
headerStyle:{
backgroundColor:'yellow'
}

How to set Header Text as center ?
headerLayoutPreset:'center',

How to increase title size ?
headerTitleStyle:{
fontSize:30,
fontWeight:'bold'
},

How to change header title ?
headerTitle: 'Home',

How to change header text color ?
headerTintColor: 'red'

keep learning :)
..................................................................................................................................................................................................................................
Example: #4 [ Expo Facebook Login ]
import React, { Component } from 'react'
import { View, Text, Button } from 'react-native'
import * as Facebook from 'expo-facebook'
import * as firebase from 'firebase'
const firebaseConfig = {
apiKey: "AIzaSyCGGfXGkQYv5dKiR8ll8TlEl7VqrHzaVqE",
authDomain: "jobproject-bb4de.firebaseapp.com",
databaseURL: "https://jobproject-bb4de.firebaseio.com",
projectId: "jobproject-bb4de",
storageBucket: "jobproject-bb4de.appspot.com",
messagingSenderId: "187867092095",
appId: "1:187867092095:web:22b855a862e74a7e2f1b4a",
measurementId: "G-FX87CF9N6M"
};
firebase.initializeApp(firebaseConfig)
class App extends Component {
componentDidMount() {
firebase.auth().onAuthStateChanged((user) => {
if (user != null) {
console.log("We are authenticated now!");
}
});
}
loginWithFacebook = async () => {
const { type, token } = await Facebook.logInWithReadPermissionsAsync('1000817793603523',{ permissions: ['public_profile'] });
if (type === 'success') {
// Build Firebase credential with the Facebook access token.
const credential = firebase.auth.FacebookAuthProvider.credential(token);
// Sign in with credential from the Facebook user.
firebase.auth().signInWithCredential(credential).catch((error) => {
console.log(error)
// Handle Errors here.
});
}
}
render() {
return (
<View style={{ flex: 1, justifyContent: 'center', alignItems: 'center' }}>
<Text> Helloooooooo</Text>
<Button title='Facebook' onPress={this.loginWithFacebook}></Button>
</View>
)
}
}
export default App
keep learning :)
..................................................................................................................................................................................................................................
Example: #5 [ PROJECT ] [ Expo Facebook Login ]
yarn add react-navigation
Expo project
expo install react-native-gesture-handler react-native-reanimated
yarn add react-navigation-stack
yarn add react-navigation-drawer
yarn add redux redux-thunk react-redux
yarn add firebase
Expo Facebook Login
expo install expo-facebook
more details https://docs.expo.io/versions/latest/sdk/facebook/
Configure Firebase Project and Facebook App
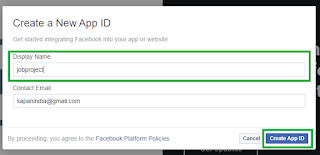
Create a Facebook app, if you haven’t already.
Get the App ID and App Secret of your Facebook App
https://developers.facebook.com/


Firebase Setup
https://console.firebase.google.com/?pli=1

Enter you project name .
 Continue

Choose Default Account for Firebase then press to continue

Continue

Created on firebase project Successfull .
 Go to project settings and down the scroll

Choose web
 +
+


..................................................................................................................................................................................................................................
Example: #4 [ Expo Facebook Login ]
import React, { Component } from 'react'
import { View, Text, Button } from 'react-native'
import * as Facebook from 'expo-facebook'
import * as firebase from 'firebase'
const firebaseConfig = {
apiKey: "AIzaSyCGGfXGkQYv5dKiR8ll8TlEl7VqrHzaVqE",
authDomain: "jobproject-bb4de.firebaseapp.com",
databaseURL: "https://jobproject-bb4de.firebaseio.com",
projectId: "jobproject-bb4de",
storageBucket: "jobproject-bb4de.appspot.com",
messagingSenderId: "187867092095",
appId: "1:187867092095:web:22b855a862e74a7e2f1b4a",
measurementId: "G-FX87CF9N6M"
};
firebase.initializeApp(firebaseConfig)
class App extends Component {
componentDidMount() {
firebase.auth().onAuthStateChanged((user) => {
if (user != null) {
console.log("We are authenticated now!");
}
});
}
loginWithFacebook = async () => {
const { type, token } = await Facebook.logInWithReadPermissionsAsync('1000817793603523',{ permissions: ['public_profile'] });
if (type === 'success') {
// Build Firebase credential with the Facebook access token.
const credential = firebase.auth.FacebookAuthProvider.credential(token);
// Sign in with credential from the Facebook user.
firebase.auth().signInWithCredential(credential).catch((error) => {
console.log(error)
// Handle Errors here.
});
}
}
render() {
return (
<View style={{ flex: 1, justifyContent: 'center', alignItems: 'center' }}>
<Text> Helloooooooo</Text>
<Button title='Facebook' onPress={this.loginWithFacebook}></Button>
</View>
)
}
}
export default App
keep learning :)
..................................................................................................................................................................................................................................
Example: #5 [ PROJECT ] [ Expo Facebook Login ]
yarn add react-navigation
Expo project
expo install react-native-gesture-handler react-native-reanimated
yarn add react-navigation-stack
yarn add react-navigation-drawer
yarn add redux redux-thunk react-redux
yarn add firebase
yarn add react-navigation-header-buttons
Expo Facebook Login
expo install expo-facebook
more details https://docs.expo.io/versions/latest/sdk/facebook/
Configure Firebase Project and Facebook App
Create a Facebook app, if you haven’t already.
Get the App ID and App Secret of your Facebook App
https://developers.facebook.com/


Privacy Policy URL
https://www.onlinekhabar.com/privacy-policy
Terms of Service URL
https://www.termsfeed.com/blog/sample-terms-of-service-template/

Key Hashes
Provided by expo


Firebase Setup
https://console.firebase.google.com/?pli=1

Enter you project name .

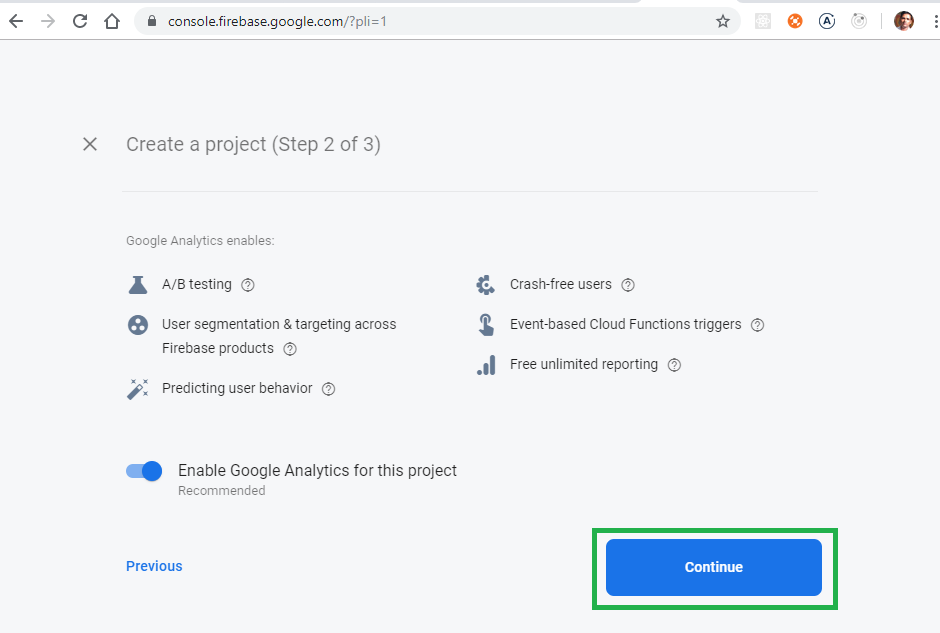
Choose Default Account for Firebase then press to continue

Continue

Created on firebase project Successfull .

Choose web
 +
+


keep learning :)
..................................................................................................................................................................................................................................
Example: #5 [ Navigation V5 ] [ Expo Firebase Login with Email and password ]
import React, { Component } from 'react';
import { View, Text, KeyboardAvoidingView, StyleSheet, Button, TextInput, ActivityIndicator, Alert } from 'react-native';
import { NavigationContainer } from '@react-navigation/native';
import { createStackNavigator, } from '@react-navigation/stack'
import * as Firebase from 'firebase';
import { firebaseConfig } from './src/configs/firebaseConfig'
Firebase.initializeApp(firebaseConfig)
class Loading extends Component {
constructor(props) {
super(props)
this.state = {
email: ''
}
}
componentDidMount() {
this.unSubscribeAuth = Firebase.auth().onAuthStateChanged((user) => {
if (user) {
this.props.navigation.navigate('Home')
} else {
this.props.navigation.navigate('Login')
}
})
}
componentWillUnmount() {
this.unSubscribeAuth()
}
render() {
return (
<View style={{ flex: 1, justifyContent: 'center', alignItems: 'center' }}>
<ActivityIndicator size={"large"}></ActivityIndicator>
</View>
)
}
}
class Home extends Component {
constructor(props) {
super(props)
this.state = {
email: ''
}
}
componentDidMount() {
this.unSubscribeAuth = Firebase.auth().onAuthStateChanged((user) => {
if (user) {
this.setState({
email: user.email
// phone:user.phoneNumber
})
} else {
this.props.navigation.replace('Login')
}
})
}
componentWillUnmount() {
this.unSubscribeAuth()
}
_userSingOut = () => {
Firebase.auth().signOut()
.catch(error => {
Alert.alert(error.message)
})
}
render() {
return (
<View style={{ flex: 1, justifyContent: 'center', alignItems: 'center' }}>
<Text> Home</Text>
<Text> You are logged in: {this.state.email}</Text>
<View style={{ marginVertical: 10 }}>
<Button title='Log out' onPress={this._userSingOut}></Button>
</View>
</View>
)
}
}
class Signup extends Component {
constructor(props) {
super(props)
this.state = {
email: '',
password: ''
}
}
_userSignUp = (email, password) => {
console.log(this.state);
Firebase.auth().createUserWithEmailAndPassword(email, password)
.then(() => {
//this.props.navigation.navigate('Home')
this.props.navigation.replace('Home')
}).catch(error => {
Alert.alert(error.message)
})
}
render() {
return (
<KeyboardAvoidingView>
<View style={styles.container}>
<Text> Signup</Text>
<View>
<TextInput style={styles.input} value={this.state.email} onChangeText={(text) => this.setState({ email: text })} />
</View>
<View>
<TextInput style={styles.input} value={this.state.password} onChangeText={(text) => this.setState({ password: text })} />
</View>
<View style={{ marginVertical: 10 }}>
<Button title='Sign up' onPress={() => this._userSignUp(this.state.email, this.state.password)}></Button>
</View>
<View>
<Button title='Already have an account ?' onPress={() => this.props.navigation.navigate('Login')}></Button>
</View>
</View>
</KeyboardAvoidingView>
)
}
}
class Login extends Component {
constructor(props) {
super(props)
this.state = {
email: '',
password: ''
}
}
_userSignIn = (email, password) => {
console.log(this.state)
Firebase.auth().signInWithEmailAndPassword(email, password)
.then(() => {
this.props.navigation.navigate('Home')
}).catch(error => {
console.log(error.message)
})
}
render() {
return (
<KeyboardAvoidingView>
<View style={styles.container}>
<Text> Login </Text>
<View>
<TextInput style={styles.input} value={this.state.email} onChangeText={(text) => this.setState({ email: text })} />
</View>
<View>
<TextInput style={styles.input} value={this.state.password} onChangeText={(text) => this.setState({ password: text })} />
</View>
<View style={{ marginVertical: 10 }}>
<Button title='Login' onPress={() => this._userSignIn(this.state.email, this.state.password)}></Button>
</View>
<View >
<Button title='Donot have an account ?' onPress={() => this.props.navigation.navigate('Signup')}></Button>
</View>
</View>
</KeyboardAvoidingView>
)
}
}
const Stack = createStackNavigator();
export default class App extends Component {
render() {
return (
<NavigationContainer >
<Stack.Navigator initialRouteName='Signup' >
<Stack.Screen name='Loading' component={Loading} options={{ headerShown: false }} />
<Stack.Screen name='Home' component={Home} />
<Stack.Screen name='Signup' component={Signup} options={{ title: 'Signup' }} />
<Stack.Screen name='Login' component={Login} options={{ title: 'Login' }} />
</Stack.Navigator>
</NavigationContainer>
)
}
}
const styles = StyleSheet.create({
container: {
justifyContent: 'center',
marginTop: 50,
paddingLeft: 40,
paddingRight: 40,
},
input: {
height: 40,
borderColor: 'green',
borderWidth: 2,
borderRadius: 5,
marginBottom: 20
}
})


keep learning :)


Happy Coding :)
Example: #5 [ Navigation V5 ] [ Expo Firebase Login with Email and password ]
import React, { Component } from 'react';
import { View, Text, KeyboardAvoidingView, StyleSheet, Button, TextInput, ActivityIndicator, Alert } from 'react-native';
import { NavigationContainer } from '@react-navigation/native';
import { createStackNavigator, } from '@react-navigation/stack'
import * as Firebase from 'firebase';
import { firebaseConfig } from './src/configs/firebaseConfig'
Firebase.initializeApp(firebaseConfig)
class Loading extends Component {
constructor(props) {
super(props)
this.state = {
email: ''
}
}
componentDidMount() {
this.unSubscribeAuth = Firebase.auth().onAuthStateChanged((user) => {
if (user) {
this.props.navigation.navigate('Home')
} else {
this.props.navigation.navigate('Login')
}
})
}
componentWillUnmount() {
this.unSubscribeAuth()
}
render() {
return (
<View style={{ flex: 1, justifyContent: 'center', alignItems: 'center' }}>
<ActivityIndicator size={"large"}></ActivityIndicator>
</View>
)
}
}
class Home extends Component {
constructor(props) {
super(props)
this.state = {
email: ''
}
}
componentDidMount() {
this.unSubscribeAuth = Firebase.auth().onAuthStateChanged((user) => {
if (user) {
this.setState({
email: user.email
// phone:user.phoneNumber
})
} else {
this.props.navigation.replace('Login')
}
})
}
componentWillUnmount() {
this.unSubscribeAuth()
}
_userSingOut = () => {
Firebase.auth().signOut()
.catch(error => {
Alert.alert(error.message)
})
}
render() {
return (
<View style={{ flex: 1, justifyContent: 'center', alignItems: 'center' }}>
<Text> Home</Text>
<Text> You are logged in: {this.state.email}</Text>
<View style={{ marginVertical: 10 }}>
<Button title='Log out' onPress={this._userSingOut}></Button>
</View>
</View>
)
}
}
class Signup extends Component {
constructor(props) {
super(props)
this.state = {
email: '',
password: ''
}
}
_userSignUp = (email, password) => {
console.log(this.state);
Firebase.auth().createUserWithEmailAndPassword(email, password)
.then(() => {
//this.props.navigation.navigate('Home')
this.props.navigation.replace('Home')
}).catch(error => {
Alert.alert(error.message)
})
}
render() {
return (
<KeyboardAvoidingView>
<View style={styles.container}>
<Text> Signup</Text>
<View>
<TextInput style={styles.input} value={this.state.email} onChangeText={(text) => this.setState({ email: text })} />
</View>
<View>
<TextInput style={styles.input} value={this.state.password} onChangeText={(text) => this.setState({ password: text })} />
</View>
<View style={{ marginVertical: 10 }}>
<Button title='Sign up' onPress={() => this._userSignUp(this.state.email, this.state.password)}></Button>
</View>
<View>
<Button title='Already have an account ?' onPress={() => this.props.navigation.navigate('Login')}></Button>
</View>
</View>
</KeyboardAvoidingView>
)
}
}
class Login extends Component {
constructor(props) {
super(props)
this.state = {
email: '',
password: ''
}
}
_userSignIn = (email, password) => {
console.log(this.state)
Firebase.auth().signInWithEmailAndPassword(email, password)
.then(() => {
this.props.navigation.navigate('Home')
}).catch(error => {
console.log(error.message)
})
}
render() {
return (
<KeyboardAvoidingView>
<View style={styles.container}>
<Text> Login </Text>
<View>
<TextInput style={styles.input} value={this.state.email} onChangeText={(text) => this.setState({ email: text })} />
</View>
<View>
<TextInput style={styles.input} value={this.state.password} onChangeText={(text) => this.setState({ password: text })} />
</View>
<View style={{ marginVertical: 10 }}>
<Button title='Login' onPress={() => this._userSignIn(this.state.email, this.state.password)}></Button>
</View>
<View >
<Button title='Donot have an account ?' onPress={() => this.props.navigation.navigate('Signup')}></Button>
</View>
</View>
</KeyboardAvoidingView>
)
}
}
const Stack = createStackNavigator();
export default class App extends Component {
render() {
return (
<NavigationContainer >
<Stack.Navigator initialRouteName='Signup' >
<Stack.Screen name='Loading' component={Loading} options={{ headerShown: false }} />
<Stack.Screen name='Home' component={Home} />
<Stack.Screen name='Signup' component={Signup} options={{ title: 'Signup' }} />
<Stack.Screen name='Login' component={Login} options={{ title: 'Login' }} />
</Stack.Navigator>
</NavigationContainer>
)
}
}
const styles = StyleSheet.create({
container: {
justifyContent: 'center',
marginTop: 50,
paddingLeft: 40,
paddingRight: 40,
},
input: {
height: 40,
borderColor: 'green',
borderWidth: 2,
borderRadius: 5,
marginBottom: 20
}
})


keep learning :)

..................................................................................................................................................................................................................................
Example: #6 [ CRUD Firebase ]
import React, { Component } from 'react';
import { View, Text, TextInput, Button } from 'react-native';
import * as Firebase from 'firebase';
import { firebaseConfig } from './src/configs/firebaseConfig';
Firebase.initializeApp(firebaseConfig);
class Home extends Component {
constructor(props) {
super(props)
this.state = {
item: '',
myList: []
}
}
componentDidMount() {
this. myFetch =Firebase.database().ref('mySchool').on('value', snapShot => {
if (snapShot.val()) {
this.setState({ myList: Object.values(snapShot.val()) })
}
})
}
componentWillUnmount(){
this.myFetch()
}
_saveItems = () => {
Firebase.database().ref('mySchool').push().set({ text: this.state.item })
this.setState({ item: "" })
}
_removeItems = () => {
Firebase.database().ref('mySchool').remove()
this.setState({ myList: [] })
}
render() {
const myFetchData = this.state.myList.map((i) => {
return (
<View key={i}>
<Text>{i.text}</Text>
</View>
)
})
return (
<View>
<Text> Well Come Firebase</Text>
<TextInput value={this.state.item} onChangeText={(text) => this.setState({ item: text })} style={{ borderColor: 'red', borderWidth: 2 }} />
<View>
<Button title='SAVE' onPress={this._saveItems}></Button>
</View>
<View>
<Button title='Delte' onPress={this._removeItems} />
</View>
{myFetchData}
</View>
)
}
}
export default class App extends Component {
render() {
return (
<Home />
)
}
}

Happy Coding :)
..................................................................................................................................................................................................................................
Example: #6 [ Navigation V4 ]
Install into an existing project

keep learning :)
Example: #6 [ CRUD Firebase ]
import React, { Component } from 'react';
import { View, Text, TextInput, Button } from 'react-native';
import * as Firebase from 'firebase';
import { firebaseConfig } from './src/configs/firebaseConfig';
Firebase.initializeApp(firebaseConfig);
class Home extends Component {
constructor(props) {
super(props)
this.state = {
item: '',
myList: []
}
}
componentDidMount() {
this. myFetch =Firebase.database().ref('mySchool').on('value', snapShot => {
if (snapShot.val()) {
this.setState({ myList: Object.values(snapShot.val()) })
}
})
}
componentWillUnmount(){
this.myFetch()
}
_saveItems = () => {
Firebase.database().ref('mySchool').push().set({ text: this.state.item })
this.setState({ item: "" })
}
_removeItems = () => {
Firebase.database().ref('mySchool').remove()
this.setState({ myList: [] })
}
render() {
const myFetchData = this.state.myList.map((i) => {
return (
<View key={i}>
<Text>{i.text}</Text>
</View>
)
})
return (
<View>
<Text> Well Come Firebase</Text>
<TextInput value={this.state.item} onChangeText={(text) => this.setState({ item: text })} style={{ borderColor: 'red', borderWidth: 2 }} />
<View>
<Button title='SAVE' onPress={this._saveItems}></Button>
</View>
<View>
<Button title='Delte' onPress={this._removeItems} />
</View>
{myFetchData}
</View>
)
}
}
export default class App extends Component {
render() {
return (
<Home />
)
}
}

..................................................................................................................................................................................................................................
Example: #6 [ Navigation V4 ]
Install into an existing project
- yarn add react-navigation
- expo install react-native-gesture-handler react-native-reanimated
- yarn add react-navigation-stack

keep learning :)
..................................................................................................................................................................................................................................
Example: #7 [ Navigation V4 ]
keep learning :)
Example: #7 [ Navigation V4 ]
keep learning :)
..................................................................................................................................................................................................................................
Example: #8 [ Navigation V4 ]
keep learning :)
Example: #8 [ Navigation V4 ]
keep learning :)
..................................................................................................................................................................................................................................
Example: #9 [ expo eject ]
expo eject
react-native run-android
keep learning :)
Example: #9 [ expo eject ]
expo eject
react-native run-android
keep learning :)
Notes
expo install @expo/vector-icons
expo install @expo/vector-icons
No comments:
Post a Comment